Showing posts with label skills. Show all posts

Friday, July 12, 2013

The value of basic handy-man skills

Let's say the world comes to an end tomorrow. Will knowing how to paint your walls or fix a leaky pipe matter? No, we'd all be gone. But, since that's unlikely to happen, we might as well plan for things to move on and for smaller emergencies to impact our life. Things like stuck doors, torn screens, and leaky sinks crop up all the time. Yes, you could call in a professional to deal with it, but you can save a few bucks and learn some things by doing them yourself.

For months, nay, years now, we've been living with bad plumbing in our kitchen. Not the constant drip that drives you slowly insane and you notice all the time. Instead, we had a few small issues that occasionally piled up. A faucet that leaked around the base when in use, but never really caused a problem was the most minor. Poor plumbing run in such a way as to interfere with under-the-sink storage was another. The worst was that the drains from both sides of the double-basin sink didn't like to stay attached. Maybe the trash can would knock it out of line, or placing a heavy item for filling, such as a bucket or dog waterer, would shake things loose. Next think you knew you had a trash can full of water, or worse if it was on the side without a receptacle to catch it! This would crop up occasionally, I would get upset and declare this needed to end, fix it "for now", and then life would get in the way and I'd forget until the next incident. A few weeks ago I declared that enough was enough.

Now, what could have been a simple project wasn't likely to stay that way for long. Neither my wife nor I much cared for the existing faucet, so just replacing it seemed the best bet. And while I could just fix the drain issue, the sink itself was a bit old and uninspiring, so it had to go. So far, not bad. But what needs to be understood by anyone who has never done such a project is that nothing will remain simple.

Step one in the whole process was to pick out the pieces we wanted. We hit the local Lowes and started to look at sinks. There's a new trend towards composites, but I'm not yet convinced of their long-term look, so we ruled them out. Most of the stainless models were little better than what we were ripping out. Then we spotted it, a beautiful porcelain white number up out of reach. It featured a larger left basin, meaning I could demand the right stay devoid of dishes for food prep. The sinks were deeper than our existing model, which would provide more room to fill the dog waterer and ease the plumbing. And it was enameled cast iron, one of my favorite combinations of all time. We needed this sink!

Sadly, our Lowes didn't have it in stock. However, a nearby one did and my wife agreed to pick it up after work. Neither of us pieced together that this sink was going to weigh in the neighborhood of 80 pounds when this plan was conceived. Thankfully, she got help to load it up and then we both lugged it into the kitchen to sit until needed.

For a new faucet, we picked a pretty cheap one that looked nice. Turns out much of it is plastic, so durability may be a problem, but we hope to sell the place before that becomes a serious issue.

Armed with these materials, I tried to determine what I would need for plumbing supplies. After numerous calculations and measurements, I felt ready to roll. I decided to wait on purchasing items until I took the old sink out. This brings us, really, to the first critical skill in home repair: home demolition.

Breaking things is easy. Breaking just the parts you want can be much tougher. The night before everything went in I set about to rip the old sink out. This meant everything was gone from that part of the counter and all dishes were clean. Knowing that I would be out of town for a week the day after this sink went in meant I had no room to wiggle. If I broke it too badly, I'd have a very, very unhappy home situation when I returned.

When removing the sink, I broke the seal (OK, it was broken, but not all of it) of silicone around the lip using a screwdriver. Our counter top is tile, so this was pretty easy to do. I then SHUT OFF THE WATER and disconnected all the plumbing. Really, shut off the water under the sink before any of it, so you can then bleed the lines and let it drain somewhere other than your cabinet floor. Once this was all done, I tried to remove the sink before leaning there were clips keeping it attached to the counter. With those removed, the sink came out and went outside.

Now the fun began. I realized that the water lines were actually PEX hose, a form of flexible plastic pipe. I don't much care for this and decided to use braided steel lines instead. I realized, too, that the base of the new sink placed the plumbing further back than the old one, so all those measurements and calculations were for not. I opted for bed instead of starting any more, hoping the next day would go smoothly.

Before heading out for a run in the morning, I took some more measurements. I stopped at the Home Depot on the way back (I'm equal opportunity on the box stores) and grabbed everything I thought I would need. Hah! Never, ever believe this will be the case. I got home and started in by cutting the old plumbing off at the highest point I could. This was at the floor of the cabinet, which I proceeded to fall through due to rot. Oh good, more fun! I proceeded to rip this rotting press board out as well, then measure for a replacement. It was now a plumbing AND carpentry project. At this point I decided I should take a picture or two.

Untitled
Untitled

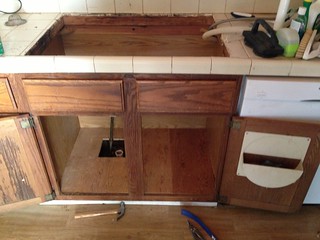
The first part of putting it all back together was to replace the floor of the cabinet. I had enough plywood around to make that happen, so I dragged out the saws and got to work. Learn how to use different saws, as they all have their place. My table and jig saws came out for this one, though the circular would have worked as well. As I the original floor had been stapled and channeled in place, I needed to make blocks to brace the new floor up. The prior floor had 2 holes in it as it was pre-fabbed to fit a variety of situations. My new one only needed a hole exactly where the plumbing was, which is what I did. Everything cut, I took it inside to see if I'd measured properly. Apparently, I did:
Untitled

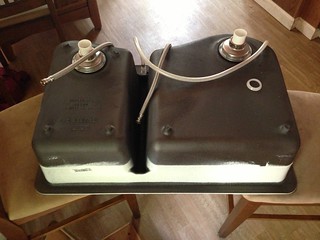
Now, back to plumbing. I quickly realized I had purchased the wrong size pipe, but before my return to the store I set up the new sink with drains to take even more measurements.
Untitled

You might notice that the sink is sitting between 2 chairs. Had I thought this out, I would have gotten help to do this, but as I was home alone at this point, I had to do it on my own. I started by placing it on cardboard, one side at a time, then putting the chairs in place and giving it a go. Doing this pointed out to me that I could never get it into the sink hole on my own without breaking the tiles around it. I still had plenty to do before help got home, so I checked some fittings, glued up the PVC for the new drain, and installed the faucet (which is actually in place on the picture above). I decided that the drain plumbing would go in after the sink was in place to verify that I had everything right.

When our teenager got home from work, I immediately conscripted her. First we ran a bead of silicone around where the sink would go. The opening was a little wider than I would have liked, but had enough overlap to handle the weight of the new sink. Once the seal was down, we hoisted the sink up and in by first lowering my edge, then having me slide under the sink to slowly lower hers. I cleaned up the seal and crawled underneath to tie it all in.

Untitled

One thing you should realize on modern plumbing is that much of it doesn't require soldering. Screw on fittings, glue, and pressure hold a lot of parts together. That means that the entire setup can go together in a matter of 20 minutes that looks like this:

Untitled

While I know I didn't go into much in the way of plumbing technique in this post, the point was more to convince you this stuff isn't rocket science. Doing this myself saved us a few hundred dollars in labor and meant I felt pretty accomplished when all was said and done. It's all stuff I've learned over the years and improved on by doing. Try crawling under you sink and just seeing how it all goes together. Maybe you'll realize it isn't as horrible as you thought. And maybe you'll someday use this to plumb up a water purifier when the zombies come!

Thursday, November 29, 2012

Testing the limits

One thing that bears consideration when you put a lot of time and effort into preparedness is how to know if you're ready when things go wrong. That involves testing the boundaries and seeing how your preps fair. I've slated 2013 for that purpose and buffing things up. Here, for your consideration, is my calendar for working on and drilling specific areas:

January - Food
My #2 priority. The goal is to take on one major task each week
1. Drag out all my stored food and review dates and quantities. Update existing spreadsheet. Hmmm, I should share that
2. Evaluate caloric intake and determine gaps for 3 month minimum for the household
3. Acquire additional long term-items, rotate into cooking schedule
4. Cook entire meal from nothing but preps, focusing on long-term storage items

February - Water
My #1 item, and also a serious weak point for me. The key points to accomplish before the end of February are:
- set up 50 gallons of drinking water
- develop water catchment system for rain water, with an eye towards watering the garden
- look into hand-pump options for the well, to be completed by mid-summer

March - 24 hour drill
The first of these, and a long time coming. Without deliberately preparing and without telling everyone else in the house, kill the power and get by on what is in the house, including using the fireplace for heat.

April - Power
Following on the heels of the March drill, I should have a better understanding of my power deficiencies. Known problems are having enough gas to run the generator for at least a full week. I also need to look into propane conversion options, solar applications, and assuring my existing Power Domes are up to snuff, including replacing the battery in one of them. Fix or plan for fixing of discovered problems.

May - Planting and gardening
I didn't put enough focus on this in 2012, so this year will be largely about getting the garden in place and ready for the year. I will also be renting a bobcat to play with swales and erosion control.

June - Bug Out Bag (BOB) shake-down
This was recommended by my family. It will mean taking everyone's bag apart and reviewing the contents, with an eye towards the July plans. By the end of the month, everyone's should be good to go. Also, a few mile hike will be done with our bags on our back to assure we can handle them.

July - Getting out
This is a drill of a different nature, but one focused on bugging out, not bugging in. The goal will be to pick a random time and load everything needed to get out within 30 minutes. Plans will be reviewed early in the month, then evaluation will follow afterwards.

August - 48 hour drill
Much like the 24 hour drill, but, you know...longer

September - Shelter
This one is still rather half-formed, but it rests largely on camping out with my various shelter options, as well as reviewing my shelter building skills. At least one night out with just the BOB will be part of this.

October - 48 hour drill
With any luck, this one goes flawlessly.
November - Security
I'm hazy on this, but my current thought is that this rests on 3-gun competition. I think it also will involve some basic skill-testing of self-defense skills, including pepper spray, with the women of the house. Additionally, they each need to show basic gun safety rules, specifically being able to assure a gun is unloaded.

December - Reflection, and Getting out part 2
No good plan or review works without taking stock in what went wrong and what went right. So, December will be a time for that reflection. Oh, and one more drill, you know, to make sure they stuck. Anyone have plans to push themselves in 2013? I'm not talking resolutions here. I'm talking plans!

Wednesday, November 21, 2012

The ongoing quest for the perfect chili

Skill time! When pondering on what next to post, my lovely wife pointed out I was in the middle of making a chili, so why not talk about that? It ties in a bit with my friend Ann's blog, Shopping in my basement as it can be made up with food you've put up. I love making up large pots of food during the winter and freezing portions for later, like chili, stew, or pot roasts, so here's a peek at one of them.

I think a lot of us are familiar with crock pot cooking. For those who aren't, it's one of the easiest ways to turn out an awesome meal with less work. Crock pots (technically "slow cookers", Crock Pot is a name brand) are easy to find. Chances are you can ask your friends and relatives and some one has one in their basement. In fact, if you're married, check your put aside gifts, you probably have one tucked away. Mine is a large 6 quart model that fits a lot of food. I've pretty well figured out the proportions by making my first stew from the included recipe book, then making up my own from there. What follows is as much of a recipe as I ever really use; I'm very much an improvisational cook.

Chili is a personal favorite of mine as every time is a little different for me. Different ingredients are available based on what's in my pantry, on sale at the store, or tickling my fancy. Thus it really becomes a quest to make the perfect chili, knowing I may never be satisfied. Major variables tend to be the meat (or lack thereof), overall heat factor (I LOVE spicy food, but not everyone can eat my level of spice), and the vegetables in season or stored. Based on what I have this time, I made what I'm calling...

New England Winter Warmer

Ingredients
1 pound spicy sausage
1 pound ground beef
1.5 pounds stew meat, cut into 1"x1/2" pieces
1 large onion
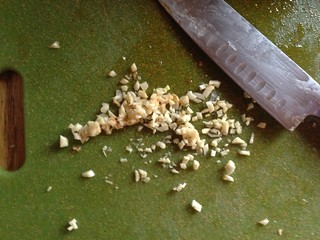
4+ cloves chopped garlic (my favorite vegetable)
2 cans Red Kidney beans (I usually use dry, but was lazy and forgot to soak)
1 can White Kidney beans
1 can Black beans
2 green bell peppers
2 Jalapeno peppers
1 Habenero pepper
1/2 dried ghost pepper
1 dried red pepper (not sure what kind. I have an assortment of dried peppers I pull from)
1 bottle Pilsner Urquell beer
1.5 quarts stewed tomatoes (put up from last year)
1 can tomato paste
1 tbsp Mexican-style chili powder
1/2 tbsp chili powder
1/2 tbsp dried Cilantro
1/2 tbsp smoked salt (magic, this stuff!)
1 tsp hot smoked paprika
1 tsp mild smoked paprika
1 tbsp course ground pepper
1 heaping tbsp real maple syrup

Step 1

Begin by browning up the meats. The sausage will take the longest as it needs to cook through. If it isn't cooked brown all the through, it will finish in the chili. Just make sure it isn't raw in the middle and things should be fine.

Untitled
I never sau-sage nice browning!


I like to throw the onions and garlic in with the ground beef while it browns to mellow them out a bit while imparting flavor to the meat. Chop up the garlic first...

Untitled
My favorite vegetable


...then throw it in with the ground beef. Make sure you drain your meat before adding it to the slow cooker as liquid fat isn't tasty. At this point, you can use the beer to de-glaze the pan. This time I opted not to, as I wanted slightly lighter, sweeter chili. Add all the meats into the slow cooker.

If I were doing this solely from preps, this could be done with Freeze Dried ground beef or canned meat of many types.

Step 2

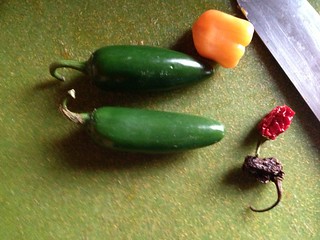
Chop up your peppers and add them to the pot.

Untitled
Small, but potent


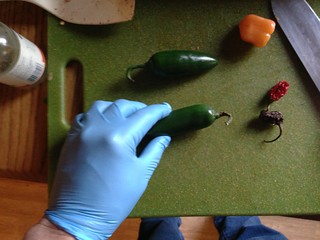
When chopping your green peppers, remove the seeds and the connective tissue inside the peppers, the white, spongy stuff. The same is true for the hot peppers, but I STRONGLY advise putting on rubber gloves before handling them. Capsaicin is a nasty chemical and will cling to your fingers long after you have washed your hands 2 or 3 times. Then, next time you rub your eyes or nose, you will essentially pepper spray yourself. Trust me, it isn't fun!

Untitled
Two by Two, hands of blue


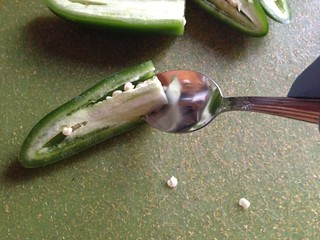
I like to chop the bell peppers fairly large, about 1/2" squares, the jalapenos in half then slices, and the small peppers I chop fine. This means someone is less likely to get bite down on a serious amount of heat! I also like to remove the seeds and connective tissue in the hot peppers with a spoon, which works especially well for jalapenos

Untitled
SPOON!


Now pour in your beans, draining them first if they're canned. When using dried beans, I like to let the soak overnight, though you can also cook them in lots of water to speed up the process. Read your package directions for best results.

Done from long-term stored food, dehydrate your own, or grab bell peppers here and use dried hot peppers for the rest.

Step 3

Time to add the spices and liquid to the mix! I like to put the spices in first so the liquids will carry them around. No particular order here, and add freshly ground spices if you can. During the summer I use a lot more fresh, green spices, but winter calls for dried. That's the main reasons the amounts are as high as they are, since dried spices (especially old ones) don't pack as much punch.

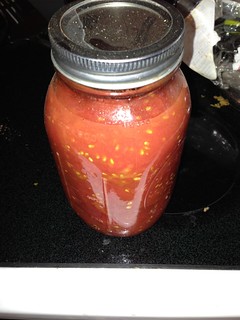
Now the liquids. Home canned tomatoes...

Untitled
See, we were worth the hours of work and steam burns!


and the beer.

Untitled
The best beer in the Czech Republic. Out of 2 beers...


Throw in you maple syrup, and slap a lid on it!.

Untitled
Primordial Chili


Step 4

Put it on to cook. This is where a slow cooker shines. When I have time, I like to set it on low for 8 hours, often timing it to start in the morning and be ready in time for dinner. Many slow cookers even have delayed time settings to make this easier. Put your chili in the fridge overnight, put it on in the morning, then enjoy when you get home. Serve with bread or rice if desired.

Once you figure out a nice base, you can mix it up next time as you continue searching for that perfect chili! So, what's your favorite winter slow-cooker food? I know I'm always open to ideas, so share them below.

Thursday, November 1, 2012

Fire building 101

One of the most commonly discussed skills in survival is fire-starting, but too often the actual building of a fire is overlooked. Don't get me wrong, I like using odd methods to get a fire going as much as the next wilderness buff, but if you get a flame going but have nowhere useful to put it, you'll end up doing all that hard work again.

I recommend practicing this at home to get to the point where you can start a fire in any condition and in short order. Pick a spot where you aren't likely to cause a fire to spread and ring it with rocks or bricks. Don't do this on a driveway as you can damage it with too much heat. You'll notice in the pictures below that I didn't ring the fire for ease of photographing only.

Prepare for the burn: Possibly the most crucial step is the one before you make the fire; gathering your materials. The rest is pretty easy if you get this down.

Fire building materials fall into a few basic areas:

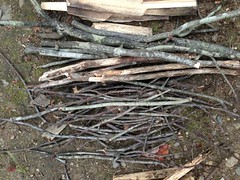
Tinder - The stuff that starts to flame. Thinks small, thin stuff. Common tinders include cotton balls, wood shavings, thin bark and twigs, paper, artificial fire starters, dry pine needles, and leaves. I don't generally like leaves myself unless they are very dry. Below you'll see dryer lint in a toilet paper tube, and old Scouting favorite (if you mostly wear natural fabrics and don't stuff it too tightly)

Artificial Tinder Natural Tinder
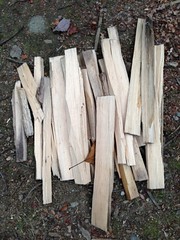
Kindling- Once you get a flame going, you need something to catch and spread it. While the tinder is always smaller than @ 1/8", kindling goes from 1/4" to an inch. There should be a variety of sizes, generally 8-12" long, and as dry as possible. Some dampness can be dealt with here as the tinder will smoke it out, but dry is better while you get your skills tight. Kindling can be gathered as dry sticks, or split from a dry log, as shown here.

Found Split
Fuel- Everything larger than kindling is fuel. This is the big stuff to be added after the fire is going BUT never too soon! More on that later.

Untitled

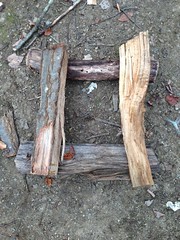
Putting it up: Take a few pieces of fuel size logs and build a windscreen. I like to stack 2 logs on top of each other to form a log cabin style. This leaves room for wind to come in and give air to the fire. Remember, a fire needs ignition, fuel, and oxygen, so don't choke it.

Untitled
If you're dealing with a windy day, you may want to put all 4 logs flat on the ground. For the rest of these pictures, I've removed these pieces for photographic reasons. Usually they will be some of the first wood to catch.
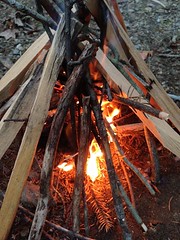
Now you need to build the heart of the fire. The overall structure is pretty straight forward. It is that of a teepee rather than a random pile. Start by placing the smallest tinder in the center of where the fire will go, then begin placing the larder tinder and kindling on it with one end on the ground and the other ends coming together into a cone. Stack it in a manner that you leave space and air between sticks, though not too much room. Do make sure to leave a small opening in the bottom to of the construction to allow your fire to be started. Now you have to decide how to start it.

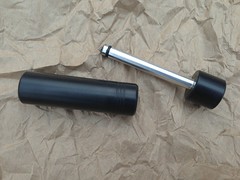
Traditionally
UntitledA fire piston

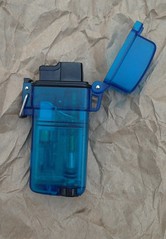
Or using a more modern method
UntitledWeatherproof lighter

Light the tinder at the bottom of the fire:
Untitled
You might need to blow on the fire a bit to get it too spread, but don't do so until you have a bit of flame going. A little blowing to spread the flame around the tinder can be a good thing, but if you have to do it too hard or much, you may not have placed enough tinder or small kindling in the middle of the fire. With practice you end up with something that becomes this!

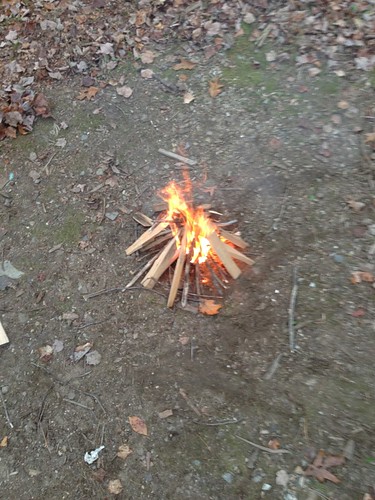
Untitled

Now you have fire! This is the time to start putting on some fuel. Small at first, then add to it. The easiest way is to lay a few pieces across the top of your initial log cabin to catch. As you build up coals, you should have little problem keeping it going. Just remember to put i tout when you're all done, and I mean VERY out. With my model fire burning for under 5 minutes, I stomped it out...

Untitled

...dropped a few leaves on the remains and blew.

Untitled
So you can see how forest fires start! Please make sure you can touch the remains of your fire without feeling any heat. Now, do it all over again till you get it down tight. Good luck!

Friday, October 12, 2012

Survivalism

Why survivalism?
Having just changed the name and broadened the focus of this blog, I figure I'd address the more controversial of the terms heading it up. While "survival" takes many forms - and I mean for it to have that broad connotation, I will freely admit to being what many term a "survivalist". Sure, there are newer, more candied terms like "prepper", but the basics remain the same; we are folks who believe in being prepared for upcoming disaster. Why? What disaster? And aren't you just hoping for the end of the world? These are the questions you face when you embrace this attitude, so I'll lay out my thoughts on it now.  

What disaster-
I'll tackle this first as I think it informs the rest. In short, any disaster. This isn't 1953; I'm not planning to survive a nuclear attack in a fallout shelter on the back yard. I'll be honest, I have a list of things I think might go wrong, but since I began listening to the Survival podcast a few years ago, I've adopted the attitude of preparing for the likely, with the understanding that I am then better set up for the worst. The current disaster de' jour is zombies. Highly unlikely. A pandemic, on the other hand? Could be. But if I prepare for a massive ice storm, the likes of which can happen her in the north, leaving us without power for weeks on end, with gas and food tougher to obtain, then I'm better set up for the bigger problems of economic collapse, failure of the US power grid, trucker strikes, or a super-flu.  

Why -
I love my family and consider it my job to help keep them safe. Sure, I can't protect them all the time, but if having a few months of food on hand, the ability to purify water, and trying to keep my debt down put us in better stead, it's worth the effort. There are lots of disasters that affect only a family, and not having to run to a grocery store while one of us is job hunting is a way to reduce some stress. And, so it's clear, yes, I do have firearms to help protect them. Does my wife like it? No. Does she put up with it? Yes. And I hope she never has a reason to be thankful I have them. And while I firmly believe 90% of people are decent at heart, 10% are, to misquote Joss Whedon, bastard-shaped bastards with bastard filling. Those are the ones I worry about if, as we say, The Sh!t Hits The Fan (TSHTF). Oh, and as most of you know, I'm an Eagle Scout, so I take Be Prepared seriously.

Aren't you just hoping for the end of the world -
Hell no! I have a nice house, a good job, and lots of fun toys! If things fall apart, I won't be taking long vacations in Europe on the back of a motorcycle, or buying the latest toys from Apple. On the other hand, I know too much about history and pay just enough attention to the world around me to fear repetition of things that have gone wrong before. Besides, laying by a some food and keeping our debt low only helps me out day to day, so why not do it?

And the world won't end, even if we do something stupid. Earth will go on spinning, and, I believe, humans will go on living. Maybe it will be different, but we are too resilient as a species to go down easy.

So now you've got a peak into my survivalist side. Hopefully not as scary as the term implies. Expect more in the future, in the meantime, ask me questions and I'll share my thoughts.

Sunday, July 8, 2012

Getting through airport security

What is it?
There are some simple things anyone can do to make dealing with the TSA less painful and assure your get to your gate on time.
Why do it?
You don't want to be that person doing a mad dash through the airport, hoping they'll hold your flight. First off, they won't. Second off, you'll end up on the plane needing to use the bathroom or starving because you had no time to deal with it before hand. Or you'll be that person in front of a Road Warrior slowing them down and making them angsty.
How did I learn it?
I started flying for work just a few weeks after 9/11. I saw first hand all the steps the TSA went through figuring this out, and that was a little painful. Currently I fly about every other week, so I have this pretty well down.
How do you learn it?
Honestly, follow these tips and you'll be in good shape!
1) Pack wisely - If you're planning to check a bag, put as much as you can into that. Specifically, put all your toiletries, multi-tools, pocket knives, tools, and non- essential electronics. The less you have to explain to an agent, the better. Check the TSA banned carry-on list and accept it as gospel.
2) Carry-on - When packing your carry-on, smaller is better. Space WILL be limited on the plane, but it's also easier to muscle a smaller bag through the scanner and tote it from gate to gate. If you're taking a laptop, don't strap it down yet, it will come out later. Also, leave enough room in your bag for the contents of your pockets. Finally, if you have toiletries in your carry-on, put them in an outside pocket.
3) Toiletries - are a pain. At this point, they really don't check often to make sure it's under 3.2 oz (that .2 comes in handy, BTW, on certain hair products!) but stay small to be safe. Big items DO get pulled. All liquids and gels go in your 1qt ziplock, but I put that ziplock in a mesh bag with my other non-liquids, like toothbrush, razor, deodorant, comb, etc.
4) Heading out - The TSA tells you to arrive 1.5-2 hours before your flight, which is likely overkill, but I stick to it. I'd rather be sitting in an airport for an extra hour than sad they wouldn't let me on. Honestly, at this point I have so many points and miles I get to skip most of the security line, but I still show up early. Parking, security lines, shuttle buses...any of these can be a hiccup. Finally, put on your easiest shoes to slip on and off, then out the door you go!
5) Checking in - I often do this at home before leaving, especially when flying Southwest. This is really great when you don't check bags as you can print your pass and walk straight to security. Drop 30 minutes from your arrival time if you're flying this way. Add 30 if you're flying with firearms. Have your confirmation ready and your license out.
6) Prepping for Security - before you get to the line to the gate, your real work begins. Put everything in your pockets into your carry-on (or jacket) EXCEPT your boarding pass and ID. I also often put my belt and watch in if I have the space.
7) ID check - hand the nice person checking IDs your boarding pass and license/passport. Don't fidget or fuss, but be polite and friendly. This can actually save you time, as they often have control over the one you head into, so if they take a liking to you they'll send you to a faster one. DO NOT say the words bomb, gun, terrorist, etc. They don't like those jokes. Also, do not downplay their job or share your opinions on the Theater of Security. 
8) Queuing up - pick what looks to be the fastest line. Avoid the one with a family with kids or old people in wheel chairs. Also, when possible avoid vacationers. Find the one populated with folks in business attire, or that already appear to be ready to go, even though there are 2 or 3 folks in front of them.
9) Bins - Once you get to the stack of bins,your real work starts. Take one if you have no laptop, 2 if you do. Throw your laptop in one, stack the other on top, then start loading up with your shoes, toiletries, watch, belt, ID, and boarding pass. I put the whole mesh bag in the bin and don't separate the ziplock out. Put them on the rollers, followed by your bags. If space is limited, stack your bags on top of each other. Do a final check for any metal on you (earings and wedding rings are fine, leave them on), then wait until your last bag/bin enters the X-Ray. Seriously, wait! I have seen folks go through and others jump ahead or the TSA pull it out when they don't know who it belongs to. Wait!
10) metal detector/body scanner - This is the biggest controversy in recent years. Most aiports now have the back scanners that caused all the hoopla. The TSA has gone through lengths to only show "hotspots" to their agents which then need a pat down. Anything, including paper, will show up as a hotspot. Multiple layers of fabric can as well. This is why we put everything in the tray. The metal detector is only picky about metal, but you may not always know which one you'll be going through. You can opt for a pat down if you prefer. And if you wear a kilt, you will get one more than likely. Ask me how I know! ;)
11) The other side - wait patiently for your bags. If they have to check one of them, DO NOT reach for it unless they tell you to. They will wait till your other bags come through to check it out. Be aware that tools of any type will normally get yanked, so check them before you get here. Also, multi-tools are a no-no, except for the new TSA approved Leatherman Micro, which you will have to explain each and every time. Trust me. Once you have your stuff, get out of the way to re-dress. Don't cause the rest of the line to wait for you!
What else can you tell me that may not be common knowledge?
Always double check your carry ons before you go! You don't want to lose something to the TSA due to your negligence. And it really does get easier with experience. Soon, like me, you'll be cursing the amateurs in your path!

Thursday, September 22, 2011

Tying things up: Knots

What is it?

Something we use every day, or at least those of us with shoelaces. There was a time, long past, when everyone knew some basic knot tying as it was the most common way to bind things together. The advent of duct tape, bungee cords, and Velcro has seriously reduced the knowledge of the average person in this regard.

Why do it?

Almost all of us have encountered a need for knots. Maybe it is tying something to the roof of a car, tying a tarp down over a grill before a storm, or even putting 2 pieces of a broken shoestring back together. If you do anything outdoors you're likely to run into this need. Or maybe you're an international spy who needs a way to truss up some guards. A few simple knots in your repertoire can greatly increase your success in these areas.

How did I learn it?

This one lies completely with Scouting. While in Webelos, we started to learn the basic knots. The troop I eventually ended up in put a lot of stock in outdoor skills like knot tying and pioneering (rope work, such as lashing) to the point where we would hold speed competitions. Such contests sometimes got a little silly, which is why I can still tie a Bowline behind my back to this day.

How do you learn it?


This is one you need to learn by doing. No matter how many times you read about how a knot is tied or watch a video, until you tie it. I recommend getting some rope or cord to try these knots out as you play with them. Be selective in the rope or cord you use. Most nylon rope will slide and be stiff, making it very poor for knot tying. You can practice with hemp, manilla, or sisal rope, available at any hardware store, but if you intend to practice indoors, be aware that it will shed fibers. I personally use paracord for practice. It is mostly nylon, but it doesn't slip and is very easy to work with. As it is something I carry with me all the time, this gives me good practice with the material to which I am most likely to have access.

There is a lot of great information out there on the web on knot tying, from step by step directions to YouTube videos. I'll share a few of my favorites here:

Animated Knots - I've found this site to have a great variety of knots. I like their presentation, the step-by-step animation, and the use of different colored ropes when tying 2 (or more) lines together.

You Tube - There are honestly thousands of videos on YouTube for tying knots. I've found those done by Expert Village cover a great variety and are fairly easy to follow, but do a search for any knot you're looking for and you'll find someone showing how it's done.

Smartphone and Tablet apps - I recently grabbed a decent free app for my iPad, and some of the paid ones provide animation or video as well. I'll often sit in front of the TV after a long day with my iPad on a knot I don't know and tie it over and over again.

ITS Tactical- Knot of the week - a little more advanced, and not always weekly, I like the unique challenges and projects they introduce.

What else can you tell me that may not be common knowledge?


Very often, folks want to know what knots they need to know. That's tricky as it all depends on the situation, but here are 5 or 6 that would serve you well:

Square knot - not the end-all, be-all some will make it out to as, this knot is still the easiest place to start and very useful for tying 2 even size lines together. Far more reliable than that Granny knot you might be using

Bowline - if you need a loop in a rope that doesn't move, this is the granddaddy of them all.

Taut line hitch - if you need a loop that CAN move, but won't under stress, use this one. This and the bowline often make up the 2 ends of a tent rope.

Sheet bend - or the double sheet bend, makes an excellent way to secure 2 differently sized lines. Like when you need to lash something to the roof and you're cobbling together various lines.

Timber hitch - not much to this one, but it works really well as part of a securing process or for hauling anything. Learn the corresponding hitches that help keep things in line.

Slip knot - Makes a great stopper that's easy to remove.

Do you have a favorite knot? Let me know!

Friday, August 19, 2011

Picking out a multi-tool

What is it?

Many posts ago I talked about carrying a knife. In that post I mentioned multi-tools, something I always like to have around. In fact, I think if I counted I must own at least 8 or more of some form or another.

Why do it?

With the invention of the folding multi-tool by Tim Leatherman in 1984 (yes, it is named after him, not for working on leather), the world of the Swiss Army knife was shaken up. Swiss Army knives still abound, the multi-tools now hold a lot of sway and provide options previously undreamt of. But picking the right tool can be a bit of a mystery. I tmay also be why I have so many!

Considerations

What matters in a multi-tool? It turns out, quite a bit.

Use: what do you want the multi-tool to do?
• Everyday needs – opening boxes, tightening screws and nuts, cutting paper, dealing with splinters, cutting your nails, opening bottles
• Camping – wood working and cutting, cord cutting, can opener, cooking (including grabbing hot pots), fixing gear, pounding stakes
• Occupation – wire cutting, crimping connectors, pliers, cutting hoses/rope/etc, filing. All things that are done by mechanics, linemen, IT workers, carpenters, electricians, etc
• Sports/recreation – bicycling, shooting, motorcycling, smithing, climbing, woodworking, etc

Carrying method: How do intend to tote it around?
• On a belt – most multi-tools have the option of a carrying pouch or a belt clip, but can get in way of a seatbelt. It can also give that "Batman utility belt" look
• In a pocket – inconspicuous, always there, but wears on pockets
• In a bag – either within its own pouch or on its own, not with you if you set the bag down
• On a clip – many have carabineer options, for loops, rings, and belt loops, but bounces around

Size/Color: how big is too big?
• Is this for everyday? If so, how much space do you have available?
• How much does it weigh, either in the pocket, a bag, etc.
• What will it go next to? Consider that it might rub against a cell phone, keys, or whatever is nearby.
• Color is largely subjective, unless you need low-vis options like black oxide. There are numerous options, including many flashy colors

Tools: What is in this thing?
• It's easy to go overboard, and better if you have a use for everything if possible. Prioritize what you really need with the other sections above
• Consider zccess to the tools you’ll need most, and more quickly – very often things like knives should be to the outside
• Locking tools, for safety
• Replacement of wearable items, such as wire-cutters
• Quality – not all tools are created equal, and some models may be better at a task than others, even from the same manufacturer

Misc
• Additional tools – bits, wrenches, etc
• Warranty – may never need, but shows a level of faith by the manufacturer
• Engraving – for that really personal option

What do you carry?

As I said, I have a bunch of these, and that doesn't include the 3 or 4 my wife has. Here are a few of my favorites and why.

Leatherman Charge TTi - I've been carrying this one for over 7 years, and it has served me very well. The ability to change out the screwdriver bits is great, which prompted me to get the optional bit set. The file is the only thing showing wear, but not yet to the point where I'll take advantage of the 25-year warranty to have it replaced. It used to ride on my belt all the time, but since I took up motorcycling, I've moved it to a sheath on my EDC. I love having the knives on the outside for quick cutting with easy thumb opening. 2 blade options is also a big benefit.

Gerber 600 Basic - Actually, I have an earlier model, but it's essentially the same. I've owned a number of these, including, until it disappeared somewhere, a customer one in forest green. I really like the one handed 'flick' opening, and have one of these in my truck and another in my 72-hour kit. I have found that some of the tools are not as tough as I'd like, and having all of the tools on the inside makes access slow.

Leatherman Style CS - This is on truck key chain. I carry the Micra on my motorcycle keychain, for similar reasons. Both of these have great scissors, a small blade, tweezers, and a few other every day tools I find useful to keep around. They are small, but that makes it easy to make sure they go with me everywhere.

Leatherman MUT - This is the newest tool in the stable, so I don't have a lot to say on it yet. I'll be getting around to a full review soon for a friend, but at least I can tell you what led me to pick it up. While I do shoot, I also play airsoft, which uses replica firearms. More than once I've needed to open up a gun to do a quick repair and didn't have the tools I needed. This will help fill that option. Additionally, it has great bit options, tougher wire-cutters, and a quick cutter for things like cord or seat belts. Finally, and this was the deciding factor, it has a hammering surface. More than once I've used the handles of the TTi to pound things, but it really isn't cut out to handle that. We'll see how it works out!

Thursday, August 4, 2011

Status Quo Bias

I heard a term today that I've thought about before, but didn't have a good label: Status Quo Bias. While it isn't a skill, per se, it is something that lead (and leads) me to develop new skills, so I wanted to share some thoughts here.

What is it?

I heard the term while listening to one of my favorite podcasts (OK, I think my favorite podcast), The Survival Podcast. Don't let the name throw you, this show is really about self-reliance and sustainability. Topics range from gardening to financial debt to wilderness survival and everything in between. Anyway, a listener sent in a link to this YouTube video: Your Yard is Evil. Very funny, very pithy, well worth the few minutes to watch. Good intro to the term.

In short, Status Quo Bias (SQB) is doing something because it's always been done or everyone else does it. Like growing a lawn, despite the silliness of the whole idea. It isn't always an old thing. In fact, I think some of our SQBs are fairly new and equally as silly. I do and learn a lot of my skills despite, or to combat SQB. Let's look at a few, as examples.

Eating out So many Americans do it. It's faster and easier, and has become the norm in many households. Yet it's costly, often bad for our health, and does it save time, really? Actually cooking and eating as a family seems to break from SQB at this point.

Car maintenance I'm not thinking of the big stuff, like replacing a cracked head, but things like changing a tire, checking your oil, radiator, and tire pressure, or being able to put on a spare all seem to have gone by the wayside. There was a time when you learned this at the same time you learned to drive, but it seems we're more than willing to rely on AAA or the various service vans that prowl the highways. But what if your have an issue on a back road and your cell phone is dead? Or, better yet, what if you could have prevented it by keeping up on some of those little items?

Carrying a knife I've talked about this before, but it is an example of SQB. As a kid, I carried a pocket knife all sorts of places, even sometimes to school. It was a tool, something you needed to have around. I have one in my pocket as I type this, and 2 more in easy reach. Yet, pull one out today and you get such interesting reactions! More often than not, it's a moment of concern followed by questions of why you need one. This is usually while you're doing something like opening a box, cutting some tough tape or cord, or one of those stupid blister packs everything comes in. My current preferred response is to stare at someone with slight disbelief and respond along the lines of "Because no one else does" or "For things like this!"

I could go on and on, but I'd love to know what you see as SQB. And, more importantly, I want us all (myself included) to think about it more and decide "Am I doing this just because of the status quo?"

Tuesday, February 15, 2011

Picking out a sewing machine

What is it?

This is something I get asked about a lot by friends and folks who know I sew. I should likely explain that I have sewn personally and professionally for over 20 years, so it doesn't surprise me to get this question. Most of the time I get this from folks who are new to sewing or want to give a gift to a someone. I think there are some critical things to look for here, and I was reminded recently when my friend Erin asked for input.

Why do it?

I find that many people eventually try their hand at sewing for a variety of reasons. Maybe they are interested in picking up a craft like quilting. Some, especially those into reenacting and living history, want to make their own costumes or period clothing. Still others just want to be able to hem their own pants or repair some items they've had sitting around for ages. Whatever the reason, if you're going to do much more than stitch on a button, most people decide a machine is worth the cost to save a ton of time. While it is true that for thousands of years man clothed himself (or, in most cases, women clothed us) doing each stitch by hand, but folks generally owned less clothing and weren't always trying to fit it around our busy modern life. So, if you think you need one, it helps to know what you need.

How did I learn it?

I learned to sew on my mom's Singer, but when I was 20 and heading back to college, I was given an old Kenmore, built into a table, by a friend's mother who just wanted it gone. That fairly unreliable machine served me until I moved back to PA and...long term borrowed my mother's again. This lead to her giving me a Singer Merit for Christmas. It wasn't until a few years later, when I got serious about making big and heavier things - plus occasionally charging for them - that I bought my first machine. Since that time, I've owned a number of machines and currently have 6 sewing machines, not including the 2 my wife owns, each with their own purpose. I've figured out what works, what doesn't, what you need, and what's really just flash.

How do you learn it?

Like owning a car, much of this is personal, but hopefully I can give you some pointers to ease your path. I'll take the path of someone new to sewing with a few pointers for those of you who may be older hands.

Usage Level - Be realistically on how much you will use this machine. That will have an impact on how much you want to spend. For the casual, once in a great while use, many of the cheap, basic models will serve. If, on the other hand, you intend to sew a lot and/or fabrics that can be tough on a machine, pay a bit more for quality. Rough fabrics can include wool, velvet, velor, leather, and canvas. Some of those seem obviously tough, but fuzzy fabrics like velvet can cause a lot of build up inside the machine's inner workings. Cheaper machines will jam up faster than a better built one as the parts may be weaker or more exposed.

Industrial or Home - Industrials are generally purpose built machines that take up a lot of space and do one task or stitch very well. For the vast majority of people out there, this is unnecessary. I own 3, but currently use none of them since leaving professional costuming. Be aware that some companies use "industrial" as a label on what is really a home model. If it doesn't include a power table and motor, it's a home model.

Stitches - This is often the first thing people see when they look at a new machine. "Wow, this one has 6 zillion stitches!" How many do you need? Realistically, 2. If I'm being downright honest with myself, 80 percent or more of my work is done with the straight and zig-zag stitches. Following that, I think that a blind hem stitch is a big help as this is great on pant legs, skirt hems, and the like. A 3-step zig-zag is another nice one to avoid rolling on certain fabrics. Past this, it's mostly window dressing.
Many people get hung up on an automatic buttonhole stitch. This is a great feature IF you do a lot of buttonholes. For a few hear and there, I don't think they're worth it. In fact, I think new users should consider doing them manually as it's good skill learning and considerable reduces your cost.

Reverse - This is standard these days, but not all reverses are created equal! The reverse lets you back-tack to lock stitches in, but can also be handy when doing buttonholes and decorative work. Many reverses require you to hold down a lever or button to move the needle backwards. Realize that this needs to be done while guiding the fabric, so that if you need to reach across or exert great pressure to perform this function, it may be tough to do regularly. Some more advanced machines allow you to hit a button and switch the current stitch to go in reverse. I feel that most folks will get by with a "hold-down" solution, but if you think there will be a lot of it consider the second option.

Feed Dogs - Fabric is moved through most sewing machines by feed dogs which move the fabric from underneath. There are exceptions, but we're not worrying about them. The point I wish to make here is that sometimes you don't want the fabric to move, either because you're darning, doing embroidery, or some other operation where YOU want to control the movement. This means that the feed dogs need to be circumvented. One option is the use of a plate, often plastic, placed over the dogs. This option, honestly, is horrible and, if possible should be avoided. The plate will break or get lost the first time you use it. Instead, consider a machine where the dogs lower if at all possible. If you think you'll never need to worry about it, take a risk, but you might find yourself regretting it.

Speed - Machines are almost always controlled by a foot pedal. This pedal often acts like a gas pedal in that the harder you push, the faster you sew. Some are little more than an on/off switch and should be avoided. One of the nicest additions to sewing machines in the last 10 or so years is the ability to set a max speed on the machine itself. Thus, no matter how far down you push the pedal, you can only go so fast. For folks just starting out this can be a good way to keep yourself from inadvertently stitching 5 inches past where you intended to be. As a more experienced, high-speed user I find it a wonderful way to slow myself down when I need to be paying more attention. The muscle memory in my foot that says "floor it!" but the slide speed on my Janome says "not so much".

Brand - Here we can get into a lot of trouble. Almost everyone in the US has fond memories of the Singer their mother got from their grandmother and how long that machine lasted. Today, Singer is the low-end offering of SVP, who own Pfaff and Husquavarna Viking. While this doesn't mean they're a bad option, it does mean they aren't the top-of-the-line they once were. Still, for the newer user, consider Singer or Brother, especially if you don't intend to use it a lot. However, if you can find used machines, consider piking up something by Pfaff, Husquavarna, or Janome. They may cost more, but will hold out for a long time. The first machine I bought myself was a Husquavarna Viking which was 10 years old when I got it. I beat that machine into the ground, making 3 period tents out of heavy weight canvas, more wool cloaks than I can count, and finally put it out to pasture after 14 years of, honestly, industrial level use.

Electronic or Mechanical - For durability and general use, nothing beats the mechanical machines. My current go to machine is an electronic model, but only because of some of the specialty items I couldn't otherwise get. Your first machine should be mechanical, especially as it provides less to go wrong! Hopefully you can suss out a lot of the small issues you find and not dealing with electronics makes this easier.

Embroidery and other hooplah - Not at first, seriously. It seems super inviting, very sexy, but spend some years mastering things like stitching 2 or more layers of cloth together. I have an embroidery machine which is now seldom used, do in part to software I can no longer run. I used it as a professional, but it was still likely overkill for what I needed. Unless this is going to be a business, don't bother.
I think that may be true of most of the gimmicky machines, like quilter's models. 9 (or more) times out of 10, you can do what you need without all the extra bells and whistles.

What else can you tell me that may not be common knowledge?

What, that's not enough? All right, consider taking a class in your new machine, or a sewing class in general. You'll be amazed at what you can learn. I got a few free with my last 2 machines and picked up techniques I never considered before.
Don't assume this will be your last machine. If you stick with this for a long time, you'll move on to another. I recently sold that Singer Merit my mom gave me to a friend's sister, where it is helping a new enthusiast get some skills under her fingers.
Oh, and don't use, or at least type, the word sewer. Everyone will read it the way they're used to seeing that word, not as sew-er.

Thursday, October 28, 2010

The value of a handshake

What is it?

This came in as a request from a reader, and it's something I have certainly thought about quite a bit. There's actually a fair bit that can be conveyed in a handshake, maybe more than you think!

Why do it?

We encounter people all the time, many of them we know and others we are meeting for the first time. How you greet them conveys a lot about who you are and what you expect out of the meeting. A handshake can also convey far more than a greeting or departure, having traditionally been used to signal agreement or to lock in a verbal contract.

How did I learn it?

This is something most, if not all of us, learn as kids. There was a time that it was really only boys that learned this, but it has changed significantly over the years. Scouting introduced me to a few variations on the handshake, as did my work at Renaissance faires. Over time I've learned that some people take such things far more seriously than others, often to my chagrin.

How do you learn it?

What you intend to convey will have a big impact here. There are a few basics that almost always apply:
The approach: extending the hand perpendicular to the ground but palm turned slightly upward is an inviting and friendly way to start a shake. It implies a willingness to help. It is always safe to extend a handshake to another man and to most women under the age of 45 or so. Older women may not shake hands as this is a fairly recent change in our society. Allow them to extend first. Often a mutual start of shakes will imply a fairly equal station and eagerness. When unclear, it can be fine to wait for a shake as the initiator will often appear inviting.

Of note, do not extend your left hand unless encountering someone who is obviously unable to shake with their right. This is still considered rude (barring inability) to many people.

The grip: thumb wrapped over the top, fourth and fifth fingers (depending on hand size) below. Grasp their hand firmly, though not forcefully. A soft or lame handshake is often seen as a sign of weakness or lack of interest. Too hard is rather juvenile and unappreciated. Never should your handshake cause pain.

The pump: One or 2 short pumps convey sincerity, especially when punctuating a greeting. These should follow the same rules as the grip, being somewhat firm but not overly vigorous. Don't pump too hard, fast, or often, as this belies a level of extreme excitement which may be construed as rude.

The eyes: this is a handshake, so who cares about the eyes? Everyone. Making eye contact while shaking shows you are as interested in meeting the person as they are in meeting you. It implies sincerity, trust, and an earnest nature. Failure to do so will make you appear uninterested at best and shifty at worst.

The release: Most handshakes will last 2-3 seconds, at which point both parties will release. If pressure is removed by the other party, take the signal and let go. Too long can become awkward.

Things to avoid: aside from the items mentioned above, it is worth noting a few other pitfalls. Greatest amongst them is avoiding a shake. This is considered a serious insult to the other party, implying a lack of interest or outright disdain for the presenter of the shake. If one needs to avoid a shake, perhaps for health reasons (IE, you're ill), this should be immediately vocalized with an apology. Similarly, wiping your hand AFTER a shake (it is acceptable before, especially if you have a dirty or sweaty palm) is very rude, akin to implying the other person is unclean or unworthy in some regard.

Variations: There are a number of uses for the handshake outside of greeting and farewell. When conveying concern or care, a second hand is often wrapped over the other person's hand, thus suggesting support and willingness to aid. this can often be seen at funerals and weddings. It has become popular in recent years for the handshake to be used by men of close acquaintance to initiate a hug, pulling the other person in but often maintaining the handshake. This allows a sense of physical separation while embraced.

Traditionally, a handshake has been used to conclude business and convey a sense of willingness to abide by any agreements discussed. In fact, it may be specifically asked for (IE, "Let's shake on it.") to seal a deal. Such a shake implies a willingness to take each other at your word and honor to follow through on any agreements in lieu of a contract or until one can be drawn. The breaking of such an arrangement signifies to the other party a lack of trustfulness.

What else can you tell me that may not be common knowledge?

There have been a variety of handshakes over the ages, but many scholars believe it began as a method to show that a person intended no harm. As long as 2 people were gripping primary fighting hands (often the right), they could not fight. During the middle ages when the sword was normally worn on the left, holding a grip would prevent the drawing of the sword.

At some points, the forearm was clasped instead of the hand, further restricting movement, even though it brought 2 people closer into contact.

Feel free to weigh in with other thoughts below!

Thursday, October 7, 2010

Basic sewing

What is it?

Putting needle and thread together to make clothing helped elevate our species up the chain of civilization. Nearly everything you wear has stitching involved, from hat to shoes. For now, we're talking about the basic hand-sewing kind.

Why do it?

Ever lost a button, or had a pair of pants that was just a little too long? Mom eventually gets sick of you calling her for help, and these days you're unlikely to find one of your friends who can stitch for you, so why not learn how yourself? It's a heck of a lot cheaper than throwing away that sweater!

How did I learn it?

Around the time I was 10, my mother decided (as she did with many such things) that her boys should know how to do their own sewing repairs. Thus were we shown how to do basic hand stitches and attaching a button using pieces of old sheets. This certainly wasn't elegant, but it meant we did all our own simple repairs moving forward, making us better at it. One of the first things I did was take my very worn and abused sock monkey and do some serious repairs. When I was done it more resembled a mummy than a monkey, but it helped me understand the basics.

Eventually, mom sat me down in front of a machine and made me learn how to make my own costumes (I was 18 and working at the local Renaissance Faire), but we'll save that for a future post, shall we?

How do you learn it?

Like so much of life, practice is key. But this one is cheap and easy. First, you need a few supplies. Go off to Joann Fabrics, Wal-Mart, or your mom's sewing box, and gather the following:

- Sewing needles (for right now, assume that most needles are essentially the same, but don't get TOO big of a needle. Look for those around 2 inches and you should be fine)
- Thread - pick black or white, for ease. Choose "all purpose" for this
- scissors - sharp is better (not the point, but the blades), standard scissors are fine
- fabric - Old sheets or t-shirts are good for this

First, go watch this video on threading the needle.

Now try making a few stitches. Start from one side of the material, stick the needle through, pull it almost all the way in, then stick the needle back down into the fabric. Do this a few more times, in one side, out the other. Now, even though you've only done one piece of fabric, you've done a stitch! It may not look pretty, it may not bee in a straight line, but you're sewing. It really is that simple.

Now take the fabric, put 2 pieces together, and do the same thing about 1/2" in from the edge. This time, after you first pull the thread through the pieces, go back down about 1/8" further along the edge. Now, run the needle through the small loop of thread prom your first past, right by the knot in the thread. Pull the rest of the thread through that loop and pull it all tight, anchoring the thread in place. Now start stitching along, trying to maintain that 1/8" distance 1/2" in from the edge. When you get down to about 3-4" of thread, push the needle through to the side where you first started. Take the needle and slide it under one of the stitches, then pull tight. Do the same thing under the new stitch you just made, but before you pull it tight, loop under from the same direction creating a loop of thread. Push your needle through this loop and pull everything tight to make a knot. Congratulations, you've just joined 2 pieces of fabric by sewing!

Some other nice tutorials to help get you going:
Sewing on a button
Hemming a pair of pants

What else can you tell me that may not be common knowledge?

Once you get these basics down, you can do a lot more with sewing. Embroidery, cross-stitch, and other needle arts are really just forms of sewing. Buttons become simple, and you might eventually find you want to take on bigger projects. That's when sewing machines come in handy, but there will always be a place for hand sewing!