For months, nay, years now, we've been living with bad plumbing in our kitchen. Not the constant drip that drives you slowly insane and you notice all the time. Instead, we had a few small issues that occasionally piled up. A faucet that leaked around the base when in use, but never really caused a problem was the most minor. Poor plumbing run in such a way as to interfere with under-the-sink storage was another. The worst was that the drains from both sides of the double-basin sink didn't like to stay attached. Maybe the trash can would knock it out of line, or placing a heavy item for filling, such as a bucket or dog waterer, would shake things loose. Next think you knew you had a trash can full of water, or worse if it was on the side without a receptacle to catch it! This would crop up occasionally, I would get upset and declare this needed to end, fix it "for now", and then life would get in the way and I'd forget until the next incident. A few weeks ago I declared that enough was enough.
Now, what could have been a simple project wasn't likely to stay that way for long. Neither my wife nor I much cared for the existing faucet, so just replacing it seemed the best bet. And while I could just fix the drain issue, the sink itself was a bit old and uninspiring, so it had to go. So far, not bad. But what needs to be understood by anyone who has never done such a project is that nothing will remain simple.
Step one in the whole process was to pick out the pieces we wanted. We hit the local Lowes and started to look at sinks. There's a new trend towards composites, but I'm not yet convinced of their long-term look, so we ruled them out. Most of the stainless models were little better than what we were ripping out. Then we spotted it, a beautiful porcelain white number up out of reach. It featured a larger left basin, meaning I could demand the right stay devoid of dishes for food prep. The sinks were deeper than our existing model, which would provide more room to fill the dog waterer and ease the plumbing. And it was enameled cast iron, one of my favorite combinations of all time. We needed this sink!
Sadly, our Lowes didn't have it in stock. However, a nearby one did and my wife agreed to pick it up after work. Neither of us pieced together that this sink was going to weigh in the neighborhood of 80 pounds when this plan was conceived. Thankfully, she got help to load it up and then we both lugged it into the kitchen to sit until needed.
For a new faucet, we picked a pretty cheap one that looked nice. Turns out much of it is plastic, so durability may be a problem, but we hope to sell the place before that becomes a serious issue.
Armed with these materials, I tried to determine what I would need for plumbing supplies. After numerous calculations and measurements, I felt ready to roll. I decided to wait on purchasing items until I took the old sink out. This brings us, really, to the first critical skill in home repair: home demolition.
Breaking things is easy. Breaking just the parts you want can be much tougher. The night before everything went in I set about to rip the old sink out. This meant everything was gone from that part of the counter and all dishes were clean. Knowing that I would be out of town for a week the day after this sink went in meant I had no room to wiggle. If I broke it too badly, I'd have a very, very unhappy home situation when I returned.
When removing the sink, I broke the seal (OK, it was broken, but not all of it) of silicone around the lip using a screwdriver. Our counter top is tile, so this was pretty easy to do. I then SHUT OFF THE WATER and disconnected all the plumbing. Really, shut off the water under the sink before any of it, so you can then bleed the lines and let it drain somewhere other than your cabinet floor. Once this was all done, I tried to remove the sink before leaning there were clips keeping it attached to the counter. With those removed, the sink came out and went outside.
Now the fun began. I realized that the water lines were actually PEX hose, a form of flexible plastic pipe. I don't much care for this and decided to use braided steel lines instead. I realized, too, that the base of the new sink placed the plumbing further back than the old one, so all those measurements and calculations were for not. I opted for bed instead of starting any more, hoping the next day would go smoothly.
Before heading out for a run in the morning, I took some more measurements. I stopped at the Home Depot on the way back (I'm equal opportunity on the box stores) and grabbed everything I thought I would need. Hah! Never, ever believe this will be the case. I got home and started in by cutting the old plumbing off at the highest point I could. This was at the floor of the cabinet, which I proceeded to fall through due to rot. Oh good, more fun! I proceeded to rip this rotting press board out as well, then measure for a replacement. It was now a plumbing AND carpentry project. At this point I decided I should take a picture or two.
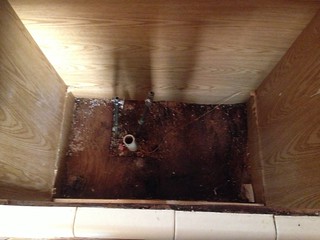

The first part of putting it all back together was to replace the floor of the cabinet. I had enough plywood around to make that happen, so I dragged out the saws and got to work. Learn how to use different saws, as they all have their place. My table and jig saws came out for this one, though the circular would have worked as well. As I the original floor had been stapled and channeled in place, I needed to make blocks to brace the new floor up. The prior floor had 2 holes in it as it was pre-fabbed to fit a variety of situations. My new one only needed a hole exactly where the plumbing was, which is what I did. Everything cut, I took it inside to see if I'd measured properly. Apparently, I did:
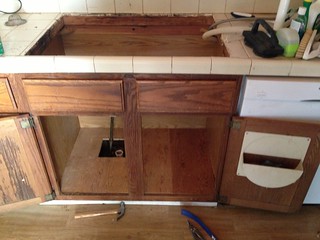
Now, back to plumbing. I quickly realized I had purchased the wrong size pipe, but before my return to the store I set up the new sink with drains to take even more measurements.
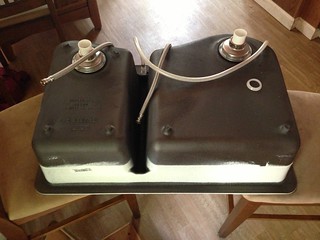
You might notice that the sink is sitting between 2 chairs. Had I thought this out, I would have gotten help to do this, but as I was home alone at this point, I had to do it on my own. I started by placing it on cardboard, one side at a time, then putting the chairs in place and giving it a go. Doing this pointed out to me that I could never get it into the sink hole on my own without breaking the tiles around it. I still had plenty to do before help got home, so I checked some fittings, glued up the PVC for the new drain, and installed the faucet (which is actually in place on the picture above). I decided that the drain plumbing would go in after the sink was in place to verify that I had everything right.
When our teenager got home from work, I immediately conscripted her. First we ran a bead of silicone around where the sink would go. The opening was a little wider than I would have liked, but had enough overlap to handle the weight of the new sink. Once the seal was down, we hoisted the sink up and in by first lowering my edge, then having me slide under the sink to slowly lower hers. I cleaned up the seal and crawled underneath to tie it all in.
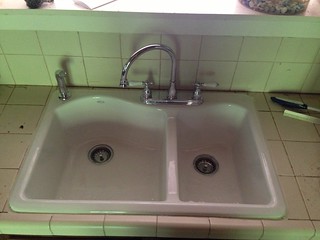
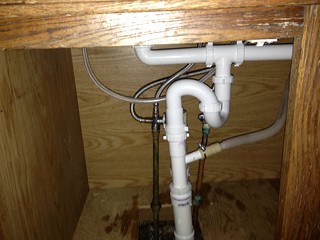
One thing you should realize on modern plumbing is that much of it doesn't require soldering. Screw on fittings, glue, and pressure hold a lot of parts together. That means that the entire setup can go together in a matter of 20 minutes that looks like this:
While I know I didn't go into much in the way of plumbing technique in this post, the point was more to convince you this stuff isn't rocket science. Doing this myself saved us a few hundred dollars in labor and meant I felt pretty accomplished when all was said and done. It's all stuff I've learned over the years and improved on by doing. Try crawling under you sink and just seeing how it all goes together. Maybe you'll realize it isn't as horrible as you thought. And maybe you'll someday use this to plumb up a water purifier when the zombies come!