Thursday, November 29, 2012
Testing the limits
One thing that bears consideration when you put a lot of time and effort into preparedness is how to know if you're ready when things go wrong. That involves testing the boundaries and seeing how your preps fair. I've slated 2013 for that purpose and buffing things up. Here, for your consideration, is my calendar for working on and drilling specific areas:
January - Food
My #2 priority. The goal is to take on one major task each week
1. Drag out all my stored food and review dates and quantities. Update existing spreadsheet. Hmmm, I should share that
2. Evaluate caloric intake and determine gaps for 3 month minimum for the household
3. Acquire additional long term-items, rotate into cooking schedule
4. Cook entire meal from nothing but preps, focusing on long-term storage items
February - Water
My #1 item, and also a serious weak point for me. The key points to accomplish before the end of February are:
- set up 50 gallons of drinking water
- develop water catchment system for rain water, with an eye towards watering the garden
- look into hand-pump options for the well, to be completed by mid-summer
March - 24 hour drill
The first of these, and a long time coming. Without deliberately preparing and without telling everyone else in the house, kill the power and get by on what is in the house, including using the fireplace for heat.
April - Power
Following on the heels of the March drill, I should have a better understanding of my power deficiencies. Known problems are having enough gas to run the generator for at least a full week. I also need to look into propane conversion options, solar applications, and assuring my existing Power Domes are up to snuff, including replacing the battery in one of them. Fix or plan for fixing of discovered problems.
May - Planting and gardening
I didn't put enough focus on this in 2012, so this year will be largely about getting the garden in place and ready for the year. I will also be renting a bobcat to play with swales and erosion control.
June - Bug Out Bag (BOB) shake-down
This was recommended by my family. It will mean taking everyone's bag apart and reviewing the contents, with an eye towards the July plans. By the end of the month, everyone's should be good to go. Also, a few mile hike will be done with our bags on our back to assure we can handle them.
July - Getting out
This is a drill of a different nature, but one focused on bugging out, not bugging in. The goal will be to pick a random time and load everything needed to get out within 30 minutes. Plans will be reviewed early in the month, then evaluation will follow afterwards.
August - 48 hour drill
Much like the 24 hour drill, but, you know...longer
September - Shelter
This one is still rather half-formed, but it rests largely on camping out with my various shelter options, as well as reviewing my shelter building skills. At least one night out with just the BOB will be part of this.
October - 48 hour drill
With any luck, this one goes flawlessly.
November - Security
I'm hazy on this, but my current thought is that this rests on 3-gun competition. I think it also will involve some basic skill-testing of self-defense skills, including pepper spray, with the women of the house. Additionally, they each need to show basic gun safety rules, specifically being able to assure a gun is unloaded.
December - Reflection, and Getting out part 2
No good plan or review works without taking stock in what went wrong and what went right. So, December will be a time for that reflection. Oh, and one more drill, you know, to make sure they stuck.
Anyone have plans to push themselves in 2013? I'm not talking resolutions here. I'm talking plans!
Wednesday, November 21, 2012
The ongoing quest for the perfect chili
Skill time! When pondering on what next to post, my lovely wife pointed out I was in the middle of making a chili, so why not talk about that? It ties in a bit with my friend Ann's blog, Shopping in my basement as it can be made up with food you've put up. I love making up large pots of food during the winter and freezing portions for later, like chili, stew, or pot roasts, so here's a peek at one of them.
I think a lot of us are familiar with crock pot cooking. For those who aren't, it's one of the easiest ways to turn out an awesome meal with less work. Crock pots (technically "slow cookers", Crock Pot is a name brand) are easy to find. Chances are you can ask your friends and relatives and some one has one in their basement. In fact, if you're married, check your put aside gifts, you probably have one tucked away. Mine is a large 6 quart model that fits a lot of food. I've pretty well figured out the proportions by making my first stew from the included recipe book, then making up my own from there. What follows is as much of a recipe as I ever really use; I'm very much an improvisational cook.
Chili is a personal favorite of mine as every time is a little different for me. Different ingredients are available based on what's in my pantry, on sale at the store, or tickling my fancy. Thus it really becomes a quest to make the perfect chili, knowing I may never be satisfied. Major variables tend to be the meat (or lack thereof), overall heat factor (I LOVE spicy food, but not everyone can eat my level of spice), and the vegetables in season or stored. Based on what I have this time, I made what I'm calling...
New England Winter Warmer
Ingredients
1 pound spicy sausage
1 pound ground beef
1.5 pounds stew meat, cut into 1"x1/2" pieces
1 large onion
4+ cloves chopped garlic (my favorite vegetable)
2 cans Red Kidney beans (I usually use dry, but was lazy and forgot to soak)
1 can White Kidney beans
1 can Black beans
2 green bell peppers
2 Jalapeno peppers
1 Habenero pepper
1/2 dried ghost pepper
1 dried red pepper (not sure what kind. I have an assortment of dried peppers I pull from)
1 bottle Pilsner Urquell beer
1.5 quarts stewed tomatoes (put up from last year)
1 can tomato paste
1 tbsp Mexican-style chili powder
1/2 tbsp chili powder
1/2 tbsp dried Cilantro
1/2 tbsp smoked salt (magic, this stuff!)
1 tsp hot smoked paprika
1 tsp mild smoked paprika
1 tbsp course ground pepper
1 heaping tbsp real maple syrup
Step 1
Begin by browning up the meats. The sausage will take the longest as it needs to cook through. If it isn't cooked brown all the through, it will finish in the chili. Just make sure it isn't raw in the middle and things should be fine.
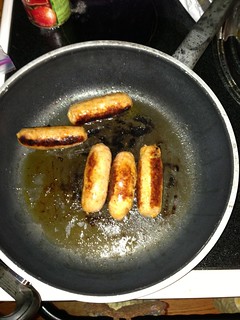 I never sau-sage nice browning!
I like to throw the onions and garlic in with the ground beef while it browns to mellow them out a bit while imparting flavor to the meat. Chop up the garlic first...
I never sau-sage nice browning!
I like to throw the onions and garlic in with the ground beef while it browns to mellow them out a bit while imparting flavor to the meat. Chop up the garlic first...
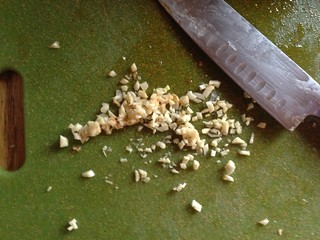 My favorite vegetable
...then throw it in with the ground beef. Make sure you drain your meat before adding it to the slow cooker as liquid fat isn't tasty. At this point, you can use the beer to de-glaze the pan. This time I opted not to, as I wanted slightly lighter, sweeter chili. Add all the meats into the slow cooker.
If I were doing this solely from preps, this could be done with Freeze Dried ground beef or canned meat of many types.
Step 2
Chop up your peppers and add them to the pot.
My favorite vegetable
...then throw it in with the ground beef. Make sure you drain your meat before adding it to the slow cooker as liquid fat isn't tasty. At this point, you can use the beer to de-glaze the pan. This time I opted not to, as I wanted slightly lighter, sweeter chili. Add all the meats into the slow cooker.
If I were doing this solely from preps, this could be done with Freeze Dried ground beef or canned meat of many types.
Step 2
Chop up your peppers and add them to the pot.
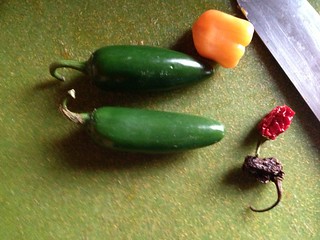 Small, but potent
When chopping your green peppers, remove the seeds and the connective tissue inside the peppers, the white, spongy stuff. The same is true for the hot peppers, but I STRONGLY advise putting on rubber gloves before handling them. Capsaicin is a nasty chemical and will cling to your fingers long after you have washed your hands 2 or 3 times. Then, next time you rub your eyes or nose, you will essentially pepper spray yourself. Trust me, it isn't fun!
Small, but potent
When chopping your green peppers, remove the seeds and the connective tissue inside the peppers, the white, spongy stuff. The same is true for the hot peppers, but I STRONGLY advise putting on rubber gloves before handling them. Capsaicin is a nasty chemical and will cling to your fingers long after you have washed your hands 2 or 3 times. Then, next time you rub your eyes or nose, you will essentially pepper spray yourself. Trust me, it isn't fun!
 Two by Two, hands of blue
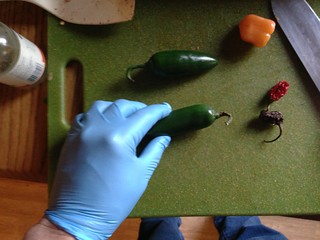
I like to chop the bell peppers fairly large, about 1/2" squares, the jalapenos in half then slices, and the small peppers I chop fine. This means someone is less likely to get bite down on a serious amount of heat! I also like to remove the seeds and connective tissue in the hot peppers with a spoon, which works especially well for jalapenos
Two by Two, hands of blue
I like to chop the bell peppers fairly large, about 1/2" squares, the jalapenos in half then slices, and the small peppers I chop fine. This means someone is less likely to get bite down on a serious amount of heat! I also like to remove the seeds and connective tissue in the hot peppers with a spoon, which works especially well for jalapenos
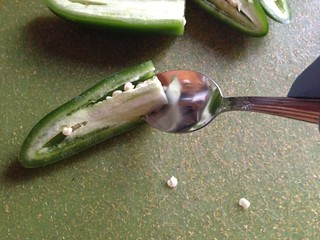 SPOON!
Now pour in your beans, draining them first if they're canned. When using dried beans, I like to let the soak overnight, though you can also cook them in lots of water to speed up the process. Read your package directions for best results.
Done from long-term stored food, dehydrate your own, or grab bell peppers here and use dried hot peppers for the rest.
Step 3
Time to add the spices and liquid to the mix! I like to put the spices in first so the liquids will carry them around. No particular order here, and add freshly ground spices if you can. During the summer I use a lot more fresh, green spices, but winter calls for dried. That's the main reasons the amounts are as high as they are, since dried spices (especially old ones) don't pack as much punch.
Now the liquids. Home canned tomatoes...
SPOON!
Now pour in your beans, draining them first if they're canned. When using dried beans, I like to let the soak overnight, though you can also cook them in lots of water to speed up the process. Read your package directions for best results.
Done from long-term stored food, dehydrate your own, or grab bell peppers here and use dried hot peppers for the rest.
Step 3
Time to add the spices and liquid to the mix! I like to put the spices in first so the liquids will carry them around. No particular order here, and add freshly ground spices if you can. During the summer I use a lot more fresh, green spices, but winter calls for dried. That's the main reasons the amounts are as high as they are, since dried spices (especially old ones) don't pack as much punch.
Now the liquids. Home canned tomatoes...
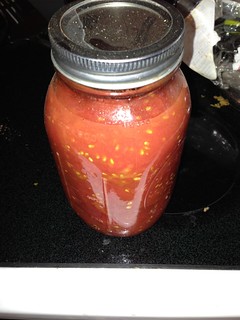 See, we were worth the hours of work and steam burns!
and the beer.
See, we were worth the hours of work and steam burns!
and the beer.
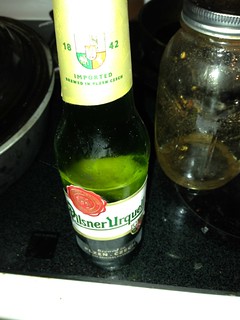 The best beer in the Czech Republic. Out of 2 beers...
Throw in you maple syrup, and slap a lid on it!.
The best beer in the Czech Republic. Out of 2 beers...
Throw in you maple syrup, and slap a lid on it!.
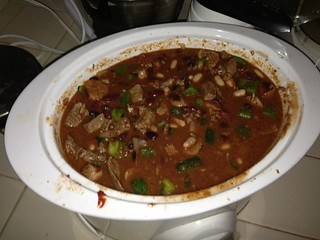 Primordial Chili
Step 4
Put it on to cook. This is where a slow cooker shines. When I have time, I like to set it on low for 8 hours, often timing it to start in the morning and be ready in time for dinner. Many slow cookers even have delayed time settings to make this easier. Put your chili in the fridge overnight, put it on in the morning, then enjoy when you get home. Serve with bread or rice if desired.
Once you figure out a nice base, you can mix it up next time as you continue searching for that perfect chili! So, what's your favorite winter slow-cooker food? I know I'm always open to ideas, so share them below.
Primordial Chili
Step 4
Put it on to cook. This is where a slow cooker shines. When I have time, I like to set it on low for 8 hours, often timing it to start in the morning and be ready in time for dinner. Many slow cookers even have delayed time settings to make this easier. Put your chili in the fridge overnight, put it on in the morning, then enjoy when you get home. Serve with bread or rice if desired.
Once you figure out a nice base, you can mix it up next time as you continue searching for that perfect chili! So, what's your favorite winter slow-cooker food? I know I'm always open to ideas, so share them below.
I never sau-sage nice browning!
I like to throw the onions and garlic in with the ground beef while it browns to mellow them out a bit while imparting flavor to the meat. Chop up the garlic first...
My favorite vegetable
...then throw it in with the ground beef. Make sure you drain your meat before adding it to the slow cooker as liquid fat isn't tasty. At this point, you can use the beer to de-glaze the pan. This time I opted not to, as I wanted slightly lighter, sweeter chili. Add all the meats into the slow cooker.
If I were doing this solely from preps, this could be done with Freeze Dried ground beef or canned meat of many types.
Step 2
Chop up your peppers and add them to the pot.
Small, but potent
When chopping your green peppers, remove the seeds and the connective tissue inside the peppers, the white, spongy stuff. The same is true for the hot peppers, but I STRONGLY advise putting on rubber gloves before handling them. Capsaicin is a nasty chemical and will cling to your fingers long after you have washed your hands 2 or 3 times. Then, next time you rub your eyes or nose, you will essentially pepper spray yourself. Trust me, it isn't fun!
Two by Two, hands of blue
I like to chop the bell peppers fairly large, about 1/2" squares, the jalapenos in half then slices, and the small peppers I chop fine. This means someone is less likely to get bite down on a serious amount of heat! I also like to remove the seeds and connective tissue in the hot peppers with a spoon, which works especially well for jalapenos
SPOON!
Now pour in your beans, draining them first if they're canned. When using dried beans, I like to let the soak overnight, though you can also cook them in lots of water to speed up the process. Read your package directions for best results.
Done from long-term stored food, dehydrate your own, or grab bell peppers here and use dried hot peppers for the rest.
Step 3
Time to add the spices and liquid to the mix! I like to put the spices in first so the liquids will carry them around. No particular order here, and add freshly ground spices if you can. During the summer I use a lot more fresh, green spices, but winter calls for dried. That's the main reasons the amounts are as high as they are, since dried spices (especially old ones) don't pack as much punch.
Now the liquids. Home canned tomatoes...
See, we were worth the hours of work and steam burns!
and the beer.
The best beer in the Czech Republic. Out of 2 beers...
Throw in you maple syrup, and slap a lid on it!.
Primordial Chili
Step 4
Put it on to cook. This is where a slow cooker shines. When I have time, I like to set it on low for 8 hours, often timing it to start in the morning and be ready in time for dinner. Many slow cookers even have delayed time settings to make this easier. Put your chili in the fridge overnight, put it on in the morning, then enjoy when you get home. Serve with bread or rice if desired.
Once you figure out a nice base, you can mix it up next time as you continue searching for that perfect chili! So, what's your favorite winter slow-cooker food? I know I'm always open to ideas, so share them below.
Tuesday, November 20, 2012
Black Friday - Survival style
For those who like getting a drop on holiday shopping with a preparedness slant, I figured I'd give a few thoughts on what's worth picking up on Black Friday. Below are some I've found in the ads that have already come out. I've broken it out by major needs.
Shelter
Coleman 6-person tent for $90, has some decent reviews.
Food
Food dehydrator for $100. A few other useful food tools on there, too.
Food storage by Rubbermaid for $15.
Water
Bottled water for $2.50.
Personal Brita filter bottle for $7.
Power/Fire
A decent generator for $280
Outside solar lights for $15
Security
Bulk .223 ammo
Reloading setups and supplies for good deals
Dick's has a few decent deals on hunting guns
Good to haves:
Garmin Nuvi GPS $70
Tool set and box for $99
Craftsman tools of various types. More here. In fact, the next few pages
Great stuff from Campmor at a variety of prices
Tons more out there, but this is a nice starting point. Anything you're eying, either for yourself or others?
Thursday, November 15, 2012
The Woodman's Pal
When it comes to chopping tools for daily, camping, and survival use, there are a variety of options. Thoughts immediately fly to hatchets and machetes, but there are a few odd items that may not come to mind. The Woodman's Pal exemplifies the unusual option.
I first encountered the Pal in Scouts. I'd forgotten about the Pal until watching the TV show The Walking Dead. One of the characters swings a Gerber Gator Pro, blatantly based off the Woodman's Pal Pro. With it back on my radar, I figured it was time to pick one up and try it out.
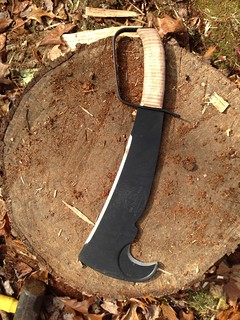 Upon looking on the Pal, you are instantly struck by the unusual shape. It might seem a blend between a machete and hatchet, but that really simplifies the whole design. There's a lot of effort that went into the original Pal to tailor it towards brush clearing and camp craft, filling the gap between a hand ax and a knife. The large, concave fore blade does most of the heavy cutting, met at the end by a wide, blunt section, then backed by a half-circle, single-slant blade. Handles vary based on the model, but this blade shape is universal to the Woodman's line.
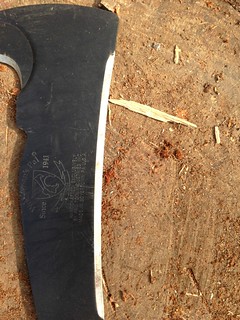
The construction of the Pal is impressive to behold. Built out of a single piece of 1/4" high carbon steel, there really isn't a point a failure in the blade. The handle itself sits on a tang that is just an extension of the blade, regardless of handle style. Having broken edged tools and weapons at the narrowing point of the tang, I can really appreciate that such a failure is unlikely on this tool. This same hefty build provides the ease of swing that defines the classic use of the Pal.
Upon looking on the Pal, you are instantly struck by the unusual shape. It might seem a blend between a machete and hatchet, but that really simplifies the whole design. There's a lot of effort that went into the original Pal to tailor it towards brush clearing and camp craft, filling the gap between a hand ax and a knife. The large, concave fore blade does most of the heavy cutting, met at the end by a wide, blunt section, then backed by a half-circle, single-slant blade. Handles vary based on the model, but this blade shape is universal to the Woodman's line.
The construction of the Pal is impressive to behold. Built out of a single piece of 1/4" high carbon steel, there really isn't a point a failure in the blade. The handle itself sits on a tang that is just an extension of the blade, regardless of handle style. Having broken edged tools and weapons at the narrowing point of the tang, I can really appreciate that such a failure is unlikely on this tool. This same hefty build provides the ease of swing that defines the classic use of the Pal.
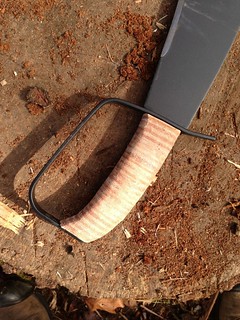 When it comes to the handle, there's a a bit of choice here. The classic handle is 2 wood scales alongside the tang. I opted to go for the Pal Pro as it has a leather handle reminiscent of the Marine Kabar knife and a knuckle guard. The Pro was developed for the military in WW2 and was deployed to troops in the Asian front. Both styles have the same shape which is similar in curve to certain grips used in sport fencing. I'll admit I found the grip uncomfortable at first, until I read the instruction manual.
Most chopping tools don't come with instructions. The assumption is that you already know how to use it when you buy it. I don't think that is true in the US today unless you've spent time camping or in a rural environment, so including instructions seems a good idea. There are also some oddities that come from the shape of the blade and the handle, so it really is worth the read. If you want more info, you can even pick up the military fighting manual from WW2.
When it comes to the handle, there's a a bit of choice here. The classic handle is 2 wood scales alongside the tang. I opted to go for the Pal Pro as it has a leather handle reminiscent of the Marine Kabar knife and a knuckle guard. The Pro was developed for the military in WW2 and was deployed to troops in the Asian front. Both styles have the same shape which is similar in curve to certain grips used in sport fencing. I'll admit I found the grip uncomfortable at first, until I read the instruction manual.
Most chopping tools don't come with instructions. The assumption is that you already know how to use it when you buy it. I don't think that is true in the US today unless you've spent time camping or in a rural environment, so including instructions seems a good idea. There are also some oddities that come from the shape of the blade and the handle, so it really is worth the read. If you want more info, you can even pick up the military fighting manual from WW2.
 In actual use, I found it very impressive. I'm working up a head-to-head with a machete and a tomahawk for the coming weeks, so I'll do more comparison then, but I'll talk to the chopping capability of the Pal. Wielded free hand for brush clearing it is really remarkable. It can cut straight through saplings and brush over and inch thick with no effort, using nothing but the weight of the blade to do the work. The trick is to relax and let the Pal do the work, not your arm. I found clearing to be a dream through briars and scrub. The flat spot at the end of the blade also means you have some protection from bottoming out in the ground or hitting rocks, thus sparing the blade.
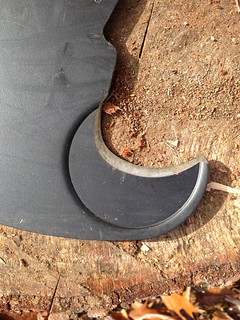 The back hook is great for dragging cut brush out of the way, as long as it takes little pressure to move it - the single angle blade does means you can cut through that brush with pressure. The hook shines when used more like a spokeshave, clearing the small branches or bark from cut saplings or branches. For quickly pulling together kindling, this can be a big time saver.
One of the greatest techniques that the Pal loans itself to is splitting small wood. The thick spine means you can place the blade where you want to split, the use another piece of wood to push it through. When working up my fire post, I split much of my tinder this way. Through seasoned wood, this was as quick or quicker as using a hatchet. The 45 degree angle really shines in this area.
I was a little disappointed when it came to cutting down longer branches. The flat that protects the blade makes it tough to lay something on a stump and cut it down. Instead you need to let the end hang over to do any chopping. If this can be arranged, it does chop effectively.
So, is it worth getting it? I'm trying to be a little more specific in reviews, so I'll look at a few key criteria, ranking each area on a scale of 1-5. I'll then sum up with a total out of 15, and whether I would buy it again.
Price: 2
This is, honestly, the worst part of the Pal. It is NOT a cheap tool. I suspect this is part of why Gerber built the Gator Pro. My Pal Pro cost @$70 and came without a sheath; adding a sheath will take another $30+. Of course, a quality tomahawk or hatchet can be pricey, but it do feel this is high for what it is. If they included a sheath I would consider it a better value.
Quality: 5
Top notch, really. I've made and handled metal tools of all sorts and have to say that this is on of the best constructed tools I've ever owned. I know of folks owning their grandfather's Pal and still using it day in and day out. This is something I seldom say about tools, and has to balance against the price. Additionally, it is made by a US company here in the States, so props to Woodsman for being able to turn out such a solid product here.
Does it do it's job?: 4
The question really is, does it do the job you want it to do? When used as suggested, this tool is surprising in it's versatility and power. It does take a bit of time to learn how to swing it for a while without fatiguing your wrist or forearm, but once you learn that, you can perform with it for a long while.
11 out of 15
Would I buy it again?
This is really the kicker. I picked the knuckle bow, but it may not be that vital, so I would skip that. I am bummed that I have to buy a separate sheath to be able to carry it in the field, but I'll break down eventually and do so. But the fact is, if I have to clear out brush or split down some small logs, I'll be reaching for this tool. I'm not sure I would want to use it in a zombie apocalypse, but in a pinch it would do. Yeah, I'd buy one again, but it's nice to know I'll never have to do so.
The back hook is great for dragging cut brush out of the way, as long as it takes little pressure to move it - the single angle blade does means you can cut through that brush with pressure. The hook shines when used more like a spokeshave, clearing the small branches or bark from cut saplings or branches. For quickly pulling together kindling, this can be a big time saver.
One of the greatest techniques that the Pal loans itself to is splitting small wood. The thick spine means you can place the blade where you want to split, the use another piece of wood to push it through. When working up my fire post, I split much of my tinder this way. Through seasoned wood, this was as quick or quicker as using a hatchet. The 45 degree angle really shines in this area.
I was a little disappointed when it came to cutting down longer branches. The flat that protects the blade makes it tough to lay something on a stump and cut it down. Instead you need to let the end hang over to do any chopping. If this can be arranged, it does chop effectively.
So, is it worth getting it? I'm trying to be a little more specific in reviews, so I'll look at a few key criteria, ranking each area on a scale of 1-5. I'll then sum up with a total out of 15, and whether I would buy it again.
Price: 2
This is, honestly, the worst part of the Pal. It is NOT a cheap tool. I suspect this is part of why Gerber built the Gator Pro. My Pal Pro cost @$70 and came without a sheath; adding a sheath will take another $30+. Of course, a quality tomahawk or hatchet can be pricey, but it do feel this is high for what it is. If they included a sheath I would consider it a better value.
Quality: 5
Top notch, really. I've made and handled metal tools of all sorts and have to say that this is on of the best constructed tools I've ever owned. I know of folks owning their grandfather's Pal and still using it day in and day out. This is something I seldom say about tools, and has to balance against the price. Additionally, it is made by a US company here in the States, so props to Woodsman for being able to turn out such a solid product here.
Does it do it's job?: 4
The question really is, does it do the job you want it to do? When used as suggested, this tool is surprising in it's versatility and power. It does take a bit of time to learn how to swing it for a while without fatiguing your wrist or forearm, but once you learn that, you can perform with it for a long while.
11 out of 15
Would I buy it again?
This is really the kicker. I picked the knuckle bow, but it may not be that vital, so I would skip that. I am bummed that I have to buy a separate sheath to be able to carry it in the field, but I'll break down eventually and do so. But the fact is, if I have to clear out brush or split down some small logs, I'll be reaching for this tool. I'm not sure I would want to use it in a zombie apocalypse, but in a pinch it would do. Yeah, I'd buy one again, but it's nice to know I'll never have to do so.
Upon looking on the Pal, you are instantly struck by the unusual shape. It might seem a blend between a machete and hatchet, but that really simplifies the whole design. There's a lot of effort that went into the original Pal to tailor it towards brush clearing and camp craft, filling the gap between a hand ax and a knife. The large, concave fore blade does most of the heavy cutting, met at the end by a wide, blunt section, then backed by a half-circle, single-slant blade. Handles vary based on the model, but this blade shape is universal to the Woodman's line.
The construction of the Pal is impressive to behold. Built out of a single piece of 1/4" high carbon steel, there really isn't a point a failure in the blade. The handle itself sits on a tang that is just an extension of the blade, regardless of handle style. Having broken edged tools and weapons at the narrowing point of the tang, I can really appreciate that such a failure is unlikely on this tool. This same hefty build provides the ease of swing that defines the classic use of the Pal.
When it comes to the handle, there's a a bit of choice here. The classic handle is 2 wood scales alongside the tang. I opted to go for the Pal Pro as it has a leather handle reminiscent of the Marine Kabar knife and a knuckle guard. The Pro was developed for the military in WW2 and was deployed to troops in the Asian front. Both styles have the same shape which is similar in curve to certain grips used in sport fencing. I'll admit I found the grip uncomfortable at first, until I read the instruction manual.
Most chopping tools don't come with instructions. The assumption is that you already know how to use it when you buy it. I don't think that is true in the US today unless you've spent time camping or in a rural environment, so including instructions seems a good idea. There are also some oddities that come from the shape of the blade and the handle, so it really is worth the read. If you want more info, you can even pick up the military fighting manual from WW2.
In actual use, I found it very impressive. I'm working up a head-to-head with a machete and a tomahawk for the coming weeks, so I'll do more comparison then, but I'll talk to the chopping capability of the Pal. Wielded free hand for brush clearing it is really remarkable. It can cut straight through saplings and brush over and inch thick with no effort, using nothing but the weight of the blade to do the work. The trick is to relax and let the Pal do the work, not your arm. I found clearing to be a dream through briars and scrub. The flat spot at the end of the blade also means you have some protection from bottoming out in the ground or hitting rocks, thus sparing the blade.
The back hook is great for dragging cut brush out of the way, as long as it takes little pressure to move it - the single angle blade does means you can cut through that brush with pressure. The hook shines when used more like a spokeshave, clearing the small branches or bark from cut saplings or branches. For quickly pulling together kindling, this can be a big time saver.
One of the greatest techniques that the Pal loans itself to is splitting small wood. The thick spine means you can place the blade where you want to split, the use another piece of wood to push it through. When working up my fire post, I split much of my tinder this way. Through seasoned wood, this was as quick or quicker as using a hatchet. The 45 degree angle really shines in this area.
I was a little disappointed when it came to cutting down longer branches. The flat that protects the blade makes it tough to lay something on a stump and cut it down. Instead you need to let the end hang over to do any chopping. If this can be arranged, it does chop effectively.
So, is it worth getting it? I'm trying to be a little more specific in reviews, so I'll look at a few key criteria, ranking each area on a scale of 1-5. I'll then sum up with a total out of 15, and whether I would buy it again.
Price: 2
This is, honestly, the worst part of the Pal. It is NOT a cheap tool. I suspect this is part of why Gerber built the Gator Pro. My Pal Pro cost @$70 and came without a sheath; adding a sheath will take another $30+. Of course, a quality tomahawk or hatchet can be pricey, but it do feel this is high for what it is. If they included a sheath I would consider it a better value.
Quality: 5
Top notch, really. I've made and handled metal tools of all sorts and have to say that this is on of the best constructed tools I've ever owned. I know of folks owning their grandfather's Pal and still using it day in and day out. This is something I seldom say about tools, and has to balance against the price. Additionally, it is made by a US company here in the States, so props to Woodsman for being able to turn out such a solid product here.
Does it do it's job?: 4
The question really is, does it do the job you want it to do? When used as suggested, this tool is surprising in it's versatility and power. It does take a bit of time to learn how to swing it for a while without fatiguing your wrist or forearm, but once you learn that, you can perform with it for a long while.
11 out of 15
Would I buy it again?
This is really the kicker. I picked the knuckle bow, but it may not be that vital, so I would skip that. I am bummed that I have to buy a separate sheath to be able to carry it in the field, but I'll break down eventually and do so. But the fact is, if I have to clear out brush or split down some small logs, I'll be reaching for this tool. I'm not sure I would want to use it in a zombie apocalypse, but in a pinch it would do. Yeah, I'd buy one again, but it's nice to know I'll never have to do so.
Wednesday, November 7, 2012
Lessons from Sandy and NYC
For those of us who live on the East Coast, last week was an exciting time. This far north in New England, it turned out to be a non-event, despite the "French Toast Syndrome" that prevailed. That's the thing about natural disasters, you never know how bad they will be. And even if they aren't bad for you, they might be for someone else.
Like the mid-Atlantic coast. They got hammered hard and will be digging themselves out for weeks and months to come. Many were prepared, or evacuated, especially those who have lived through hurricanes before. But New York City was right in the middle of the worst of Sandy, and they really took it on the chin. By now, we've all seen images of flooding tunnels or FDNY rafts on 14th Street, but, even with the water subsiding, thousands are without power, food, and gas. Here in New Hampshire, a week without power is called winter, but in a densely populated city, it can be a disaster!
According to recent reports, there are still over 100K people without power. While parts of my state were without power for 3 weeks a few years ago (heck, even during last year's Halloween Nor'easter), folks in those areas are generally more prepared and expectant of harsh weather problems. Our homes are built with this in mind (though maybe not as well as they used to be) and even the least prepper minded has seen enough storms to have a few precautions laid in at all times. Not so much the City that never sleeps. With over 8 million people, less than 2% are without power right now. During the worst of it, about 1/8th of the city lost power. We certainly aren't talking Katrina level devastation here, but in an urban environment, these things amplify.
One block without power can be thousands of people. More modern buildings, designed to make use of cheap energy, do not hold onto or allow generation of heat with outages of this nature. Fire threat plays into this design, as a single home with a shoddy fireplace that catches fire seldom threatens more than a few other residences, in a city hundreds of buildings could be in danger. Therefore, more homes rely on safer heating sources, many of which need electricity, if not for the source then for moving it around. Heck, even our wood insert needs a fan to move the heat around. Combine that with the ability to literally walk a few blocks and meet all your needs, then cut out the transportation to get out of your immediate area, and things will get messy, quick. What have we learned?
Come together:Things haven't really gotten THAT messy. Remember, most of the city has power and emergency services is hard at work keeping things calm. We certainly aren't seeing a city-wide meltdown like some have predicted as it is so localized. There are food and gas shortages happening with some squabbling but nothing major. Folks have come together to deal with adversity. I think that's one of the biggest things to take away. When disaster happens far away, we can ignore it, but when your neighbors hurt most folks will lift others up. Yay, humanity!
Food is critical:
Many of us have seen stories of New Yorkers eating from dumpsters. While I personally suspect that much of this is over-hyped, it has happened. Actually, it happens even when there isn't a catastrophe, but that's beside the point. Putting up a week's worth of food really isn't that hard to do. I've mentioned it in the past, but grabbing a few boxes of pasta, mac and cheese, cans of tuna and corn, and instant oatmeal will set you up pretty well and pretty cheaply. Seriously folks, especially if you have kids in the house, please get some extra food!
Keep warm:
With temperatures dropping below freezing at night, this is a real serious threat. In an apartment building where you have no control over the construction of your home, you're a little at the mercy of your surroundings. That doesn't mean you can't do something. Putting up some extra blankets (especially space blankets), closing off rooms you don't need, covering the windows, and having a backup heat source are all useful things to do. The most dangerous thing to do is to start a fire to keep warm when there isn't proper ventilation. We're lucky there haven't been more deaths from smoke inhalation and the like! Some ingenious New Yorkers are boiling water non-stop to heat their apartments, though this has limits, especially if you need to go out. It also depletes a major resource...
Water, water, everywhere:
Then, there's water. When there's enough to float a raft down a major street, one would think water wasn't a major concern, but not the kind you can drink. Filling up your tub and sinks can be handy for flushing, cleaning, cooking and the like, but better yet you could put up some bottles of water before everything hits. No need to go out and buy water, just fill up a few bottles from the tap. Rotate through stored water every few months or so. It doesn't "go bad", per se, but if the bottles have any bacteria that might grow, you could get some green around the edges. Ever once in while, pull out a bottle, use it up, and refill. Remember, too, that you can always boil questionable water (like that in your tub) to make it safe. You only have to bring it to boiling for a few seconds for it to be safe.
Know when to fold 'em
And sometimes, you've got to get the hell out of Dodge. Or, wherever. In the past I've talked about everyday carry, or EDC. Expect an upcoming post on a Bug Out Bag, or BOB. Feel free to Google it or read this thread over on the Survival Podcast Forum. Short version is, have the things you must grab ready to grab, then be able to make the call. Knowing you have some basic items ready can speed up your exit considerably, and provide some peace of mind if you end up in a shelter or at a loved one's place while things chill out. Personally, I hate the idea of having to leave my home, but I will ALWAYS put my and my family's welfare over holding on to some stuff.
The short of it is that prepping isn't just a rural thing to do. In fact, I would argue those in an urban area have some greater risks for which to plan. Take this as an opportunity to start!
Monday, November 5, 2012
Air travel and survivalism
For those of us who travel a lot but worry about things like having basic survival tools with us, 9/11 made things very difficult for us. There are just certain things that you simply aren't allowed to take on the plane any more. The key things for me are light, fire-starting, and a blade, the last of which is completely verboten for carry on. Shy of checking baggage, you won't be able to take one with you. Personally, I find checked baggage an inconvenience, especially if they lose it on the way to your destination! What to do? Here's where I started:
 Dealing with the light source is the easiest part. You simply need a small light that fits well on a keychain. I picked up the Led Lenser K3 at the Leatherman store in Portland, but any small light will do. To me, brightness is not as big an issue as battery life, though I might swap to a brighter light in the future. I've been in hotels where power went out and found having a light like this on you can make all the difference. It is the second most commonly used item in my pocket kit.
Fire starting is most easily done with a lighter or matches. You can now take these through TSA, though occasionally you will get accosted by a less updated agent. I like having something that has less failure opportunities, like a magnesium fire starter. Some people refer to these as flint and steel, though that isn't accurate. I found a small, compact striker that expands into a comfortable size, the Exotac Nanostriker.
Dealing with the light source is the easiest part. You simply need a small light that fits well on a keychain. I picked up the Led Lenser K3 at the Leatherman store in Portland, but any small light will do. To me, brightness is not as big an issue as battery life, though I might swap to a brighter light in the future. I've been in hotels where power went out and found having a light like this on you can make all the difference. It is the second most commonly used item in my pocket kit.
Fire starting is most easily done with a lighter or matches. You can now take these through TSA, though occasionally you will get accosted by a less updated agent. I like having something that has less failure opportunities, like a magnesium fire starter. Some people refer to these as flint and steel, though that isn't accurate. I found a small, compact striker that expands into a comfortable size, the Exotac Nanostriker.
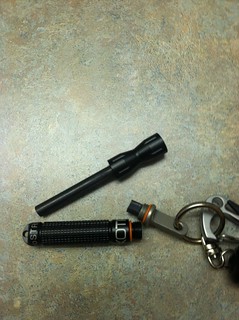 I have a number of similar strikers, including much larger ones for long term use, but this has the advantage size, a replaceable rod, and attached striker. It throws hot sparks with very little effort. The downside is that there is very little room for tinder in the starter itself, but you can squeeze a tiny amount in the top. Otherwise, you need to plan on carrying more or going without. I'm planning to carry a small pill bottle with some fire starter just in case.
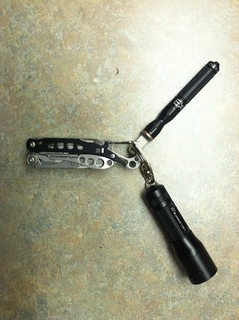
This leads us with our problem of a blade. As I said, not much to do here for a real blade, but Leatherman has decided to build something with our needs in mind. The Style PS is a micro-sized multi-tool built to be TSA compliant, which basically means it has no blade on it.
I have a number of similar strikers, including much larger ones for long term use, but this has the advantage size, a replaceable rod, and attached striker. It throws hot sparks with very little effort. The downside is that there is very little room for tinder in the starter itself, but you can squeeze a tiny amount in the top. Otherwise, you need to plan on carrying more or going without. I'm planning to carry a small pill bottle with some fire starter just in case.
This leads us with our problem of a blade. As I said, not much to do here for a real blade, but Leatherman has decided to build something with our needs in mind. The Style PS is a micro-sized multi-tool built to be TSA compliant, which basically means it has no blade on it.
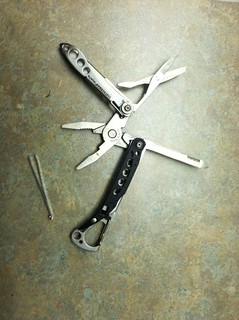 Unlike most of the Leatherman keychain tools, this one replaces the scissors with pliers and places the scissors in the blade position. The scissors are small, but sharp, passable as an emergency blade if needed. You also gain a nail file with screwdriver end and a bottle opener that is also a caribiner clip. Finally, there is a small pair of tweezers that are surprisingly good for their size. I've found the pliers to be surprisingly useful for their size and use the scissors more than I expected. Honestly, I've been very pleased with these since I've picked them up. Of course, the TSA expects anything that looks like a multi-tool doesn't meet their standards, so I always like to make sure they are out and can be easily checked by agents.
Anyone else out there travel a lot by air? What do you carry with you?
Unlike most of the Leatherman keychain tools, this one replaces the scissors with pliers and places the scissors in the blade position. The scissors are small, but sharp, passable as an emergency blade if needed. You also gain a nail file with screwdriver end and a bottle opener that is also a caribiner clip. Finally, there is a small pair of tweezers that are surprisingly good for their size. I've found the pliers to be surprisingly useful for their size and use the scissors more than I expected. Honestly, I've been very pleased with these since I've picked them up. Of course, the TSA expects anything that looks like a multi-tool doesn't meet their standards, so I always like to make sure they are out and can be easily checked by agents.
Anyone else out there travel a lot by air? What do you carry with you?
Dealing with the light source is the easiest part. You simply need a small light that fits well on a keychain. I picked up the Led Lenser K3 at the Leatherman store in Portland, but any small light will do. To me, brightness is not as big an issue as battery life, though I might swap to a brighter light in the future. I've been in hotels where power went out and found having a light like this on you can make all the difference. It is the second most commonly used item in my pocket kit.
Fire starting is most easily done with a lighter or matches. You can now take these through TSA, though occasionally you will get accosted by a less updated agent. I like having something that has less failure opportunities, like a magnesium fire starter. Some people refer to these as flint and steel, though that isn't accurate. I found a small, compact striker that expands into a comfortable size, the Exotac Nanostriker.
I have a number of similar strikers, including much larger ones for long term use, but this has the advantage size, a replaceable rod, and attached striker. It throws hot sparks with very little effort. The downside is that there is very little room for tinder in the starter itself, but you can squeeze a tiny amount in the top. Otherwise, you need to plan on carrying more or going without. I'm planning to carry a small pill bottle with some fire starter just in case.
This leads us with our problem of a blade. As I said, not much to do here for a real blade, but Leatherman has decided to build something with our needs in mind. The Style PS is a micro-sized multi-tool built to be TSA compliant, which basically means it has no blade on it.
Unlike most of the Leatherman keychain tools, this one replaces the scissors with pliers and places the scissors in the blade position. The scissors are small, but sharp, passable as an emergency blade if needed. You also gain a nail file with screwdriver end and a bottle opener that is also a caribiner clip. Finally, there is a small pair of tweezers that are surprisingly good for their size. I've found the pliers to be surprisingly useful for their size and use the scissors more than I expected. Honestly, I've been very pleased with these since I've picked them up. Of course, the TSA expects anything that looks like a multi-tool doesn't meet their standards, so I always like to make sure they are out and can be easily checked by agents.
Anyone else out there travel a lot by air? What do you carry with you?
Thursday, November 1, 2012
Fire building 101
One of the most commonly discussed skills in survival is fire-starting, but too often the actual building of a fire is overlooked. Don't get me wrong, I like using odd methods to get a fire going as much as the next wilderness buff, but if you get a flame going but have nowhere useful to put it, you'll end up doing all that hard work again.
I recommend practicing this at home to get to the point where you can start a fire in any condition and in short order. Pick a spot where you aren't likely to cause a fire to spread and ring it with rocks or bricks. Don't do this on a driveway as you can damage it with too much heat. You'll notice in the pictures below that I didn't ring the fire for ease of photographing only.
Prepare for the burn: Possibly the most crucial step is the one before you make the fire; gathering your materials. The rest is pretty easy if you get this down.
Fire building materials fall into a few basic areas:
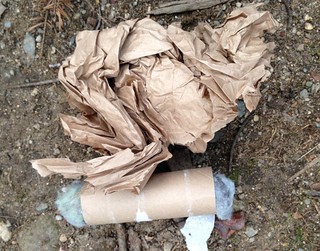
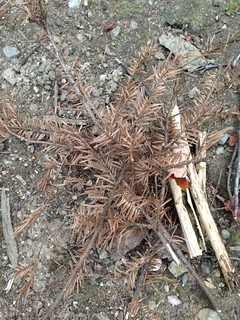
Tinder - The stuff that starts to flame. Thinks small, thin stuff. Common tinders include cotton balls, wood shavings, thin bark and twigs, paper, artificial fire starters, dry pine needles, and leaves. I don't generally like leaves myself unless they are very dry. Below you'll see dryer lint in a toilet paper tube, and old Scouting favorite (if you mostly wear natural fabrics and don't stuff it too tightly)
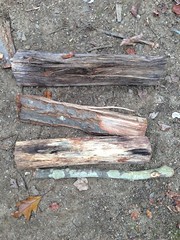
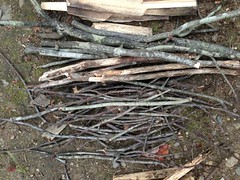
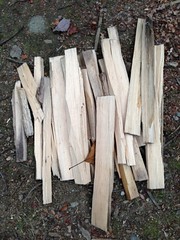
Kindling- Once you get a flame going, you need something to catch and spread it. While the tinder is always smaller than @ 1/8", kindling goes from 1/4" to an inch. There should be a variety of sizes, generally 8-12" long, and as dry as possible. Some dampness can be dealt with here as the tinder will smoke it out, but dry is better while you get your skills tight. Kindling can be gathered as dry sticks, or split from a dry log, as shown here.
Fuel- Everything larger than kindling is fuel. This is the big stuff to be added after the fire is going BUT never too soon! More on that later.
 Putting it up: Take a few pieces of fuel size logs and build a windscreen. I like to stack 2 logs on top of each other to form a log cabin style. This leaves room for wind to come in and give air to the fire. Remember, a fire needs ignition, fuel, and oxygen, so don't choke it.
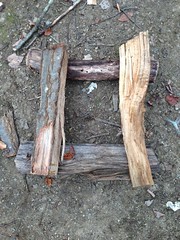 If you're dealing with a windy day, you may want to put all 4 logs flat on the ground. For the rest of these pictures, I've removed these pieces for photographic reasons. Usually they will be some of the first wood to catch.
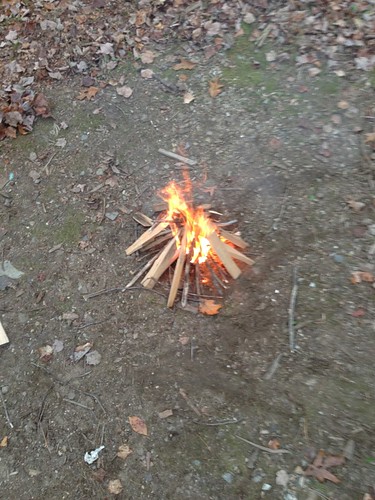
Now you need to build the heart of the fire. The overall structure is pretty straight forward. It is that of a teepee rather than a random pile. Start by placing the smallest tinder in the center of where the fire will go, then begin placing the larder tinder and kindling on it with one end on the ground and the other ends coming together into a cone. Stack it in a manner that you leave space and air between sticks, though not too much room. Do make sure to leave a small opening in the bottom to of the construction to allow your fire to be started. Now you have to decide how to start it.
If you're dealing with a windy day, you may want to put all 4 logs flat on the ground. For the rest of these pictures, I've removed these pieces for photographic reasons. Usually they will be some of the first wood to catch.
Now you need to build the heart of the fire. The overall structure is pretty straight forward. It is that of a teepee rather than a random pile. Start by placing the smallest tinder in the center of where the fire will go, then begin placing the larder tinder and kindling on it with one end on the ground and the other ends coming together into a cone. Stack it in a manner that you leave space and air between sticks, though not too much room. Do make sure to leave a small opening in the bottom to of the construction to allow your fire to be started. Now you have to decide how to start it.
Traditionally
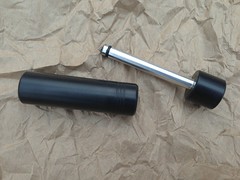 A fire piston
Or using a more modern method
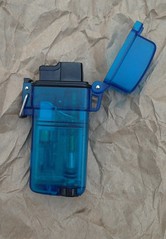 Weatherproof lighter
Light the tinder at the bottom of the fire:
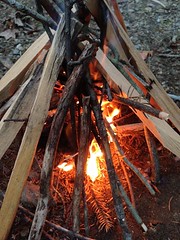
You might need to blow on the fire a bit to get it too spread, but don't do so until you have a bit of flame going. A little blowing to spread the flame around the tinder can be a good thing, but if you have to do it too hard or much, you may not have placed enough tinder or small kindling in the middle of the fire. With practice you end up with something that becomes this!
Now you have fire! This is the time to start putting on some fuel. Small at first, then add to it. The easiest way is to lay a few pieces across the top of your initial log cabin to catch. As you build up coals, you should have little problem keeping it going. Just remember to put i tout when you're all done, and I mean VERY out. With my model fire burning for under 5 minutes, I stomped it out...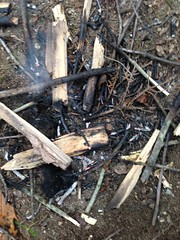 ...dropped a few leaves on the remains and blew.
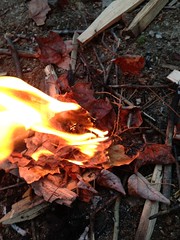
So you can see how forest fires start! Please make sure you can touch the remains of your fire without feeling any heat. Now, do it all over again till you get it down tight. Good luck!
I recommend practicing this at home to get to the point where you can start a fire in any condition and in short order. Pick a spot where you aren't likely to cause a fire to spread and ring it with rocks or bricks. Don't do this on a driveway as you can damage it with too much heat. You'll notice in the pictures below that I didn't ring the fire for ease of photographing only.
Prepare for the burn: Possibly the most crucial step is the one before you make the fire; gathering your materials. The rest is pretty easy if you get this down.
Fire building materials fall into a few basic areas:
Tinder - The stuff that starts to flame. Thinks small, thin stuff. Common tinders include cotton balls, wood shavings, thin bark and twigs, paper, artificial fire starters, dry pine needles, and leaves. I don't generally like leaves myself unless they are very dry. Below you'll see dryer lint in a toilet paper tube, and old Scouting favorite (if you mostly wear natural fabrics and don't stuff it too tightly)
 |
 |
 |
 |
Putting it up: Take a few pieces of fuel size logs and build a windscreen. I like to stack 2 logs on top of each other to form a log cabin style. This leaves room for wind to come in and give air to the fire. Remember, a fire needs ignition, fuel, and oxygen, so don't choke it.
If you're dealing with a windy day, you may want to put all 4 logs flat on the ground. For the rest of these pictures, I've removed these pieces for photographic reasons. Usually they will be some of the first wood to catch.
Now you need to build the heart of the fire. The overall structure is pretty straight forward. It is that of a teepee rather than a random pile. Start by placing the smallest tinder in the center of where the fire will go, then begin placing the larder tinder and kindling on it with one end on the ground and the other ends coming together into a cone. Stack it in a manner that you leave space and air between sticks, though not too much room. Do make sure to leave a small opening in the bottom to of the construction to allow your fire to be started. Now you have to decide how to start it.
Traditionally
A fire piston
Or using a more modern method
Weatherproof lighter
Light the tinder at the bottom of the fire:
You might need to blow on the fire a bit to get it too spread, but don't do so until you have a bit of flame going. A little blowing to spread the flame around the tinder can be a good thing, but if you have to do it too hard or much, you may not have placed enough tinder or small kindling in the middle of the fire. With practice you end up with something that becomes this!
Now you have fire! This is the time to start putting on some fuel. Small at first, then add to it. The easiest way is to lay a few pieces across the top of your initial log cabin to catch. As you build up coals, you should have little problem keeping it going. Just remember to put i tout when you're all done, and I mean VERY out. With my model fire burning for under 5 minutes, I stomped it out...
...dropped a few leaves on the remains and blew.
So you can see how forest fires start! Please make sure you can touch the remains of your fire without feeling any heat. Now, do it all over again till you get it down tight. Good luck!
Subscribe to:
Posts (Atom)